第四章 Controller接口控制器详解(1)——跟着开涛学SpringMVC
4.1、Controller简介
Controller控制器,是MVC中的部分C,为什么是部分呢?因为此处的控制器主要负责功能处理部分:
1、收集、验证请求参数并绑定到命令对象;
2、将命令对象交给业务对象,由业务对象处理并返回模型数据;
3、返回ModelAndView(Model部分是业务对象返回的模型数据,视图部分为逻辑视图名)。
还记得DispatcherServlet吗?主要负责整体的控制流程的调度部分:
1、负责将请求委托给控制器进行处理;
2、根据控制器返回的逻辑视图名选择具体的视图进行渲染(并把模型数据传入)。
因此MVC中完整的C(包含控制逻辑+功能处理)由(DispatcherServlet + Controller)组成。
因此此处的控制器是Web MVC中部分,也可以称为页面控制器、动作、处理器。
Spring Web MVC支持多种类型的控制器,比如实现Controller接口,从Spring2.5开始支持注解方式的控制器(如@Controller、@RequestMapping、@RequestParam、@ModelAttribute等),我们也可以自己实现相应的控制器(只需要定义相应的HandlerMapping和HandlerAdapter即可)。
因为考虑到还有部分公司使用继承Controller接口实现方式,因此我们也学习一下,虽然已经不推荐使用了。
对于注解方式的控制器,后边会详细讲,在此我们先学习Spring2.5以前的Controller接口实现方式。
首先我们将项目springmvc-chapter2复制一份改为项目springmvc-chapter4,本章示例将放置在springmvc-chapter4中。
大家需要将项目springmvc-chapter4/ .settings/ org.eclipse.wst.common.component下的chapter2改为chapter4,否则上下文还是“springmvc-chapter2”。以后的每一个章节都需要这么做。
4.2、Controller接口
package org.springframework.web.servlet.mvc;
public interface Controller {
       ModelAndView handleRequest(HttpServletRequest request, HttpServletResponse response) throws Exception;
}
这是控制器接口,此处只有一个方法handleRequest,用于进行请求的功能处理,处理完请求后返回ModelAndView(Model模型数据部分 和 View视图部分)。
还记得第二章的HelloWorld吗?我们的HelloWorldController实现Controller接口,Spring默认提供了一些Controller接口的实现以方便我们使用,具体继承体系如图4-1:
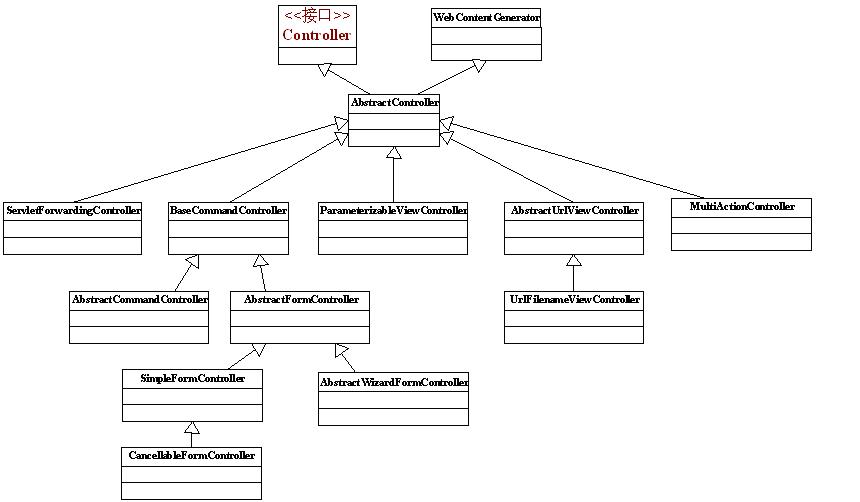
图4-1
4.3、WebContentGenerator
用于提供如浏览器缓存控制、是否必须有session开启、支持的请求方法类型(GET、POST等)等,该类主要有如下属性:
Set<String> supportedMethods:设置支持的请求方法类型,默认支持“GET”、“POST”、“HEAD”,如果我们想支持“PUT”,则可以加入该集合“PUT”。
boolean requireSession = false:是否当前请求必须有session,如果此属性为true,但当前请求没有打开session将抛出HttpSessionRequiredException异常;
boolean useExpiresHeader = true:是否使用HTTP1.0协议过期响应头:如果true则会在响应头添加:“Expires:”;需要配合cacheSeconds使用;
boolean useCacheControlHeader = true:是否使用HTTP1.1协议的缓存控制响应头,如果true则会在响应头添加;需要配合cacheSeconds使用;
boolean useCacheControlNoStore = true:是否使用HTTP 1.1协议的缓存控制响应头,如果true则会在响应头添加;需要配合cacheSeconds使用;
private int cacheSeconds = -1:缓存过期时间,正数表示需要缓存,负数表示不做任何事情(也就是说保留上次的缓存设置),
1、cacheSeconds =0时,则将设置如下响应头数据:
Pragma:no-cache // HTTP 1.0的不缓存响应头
Expires:1L // useExpiresHeader=true时,HTTP 1.0
Cache-Control:no-cache // useCacheControlHeader=true时,HTTP 1.1
Cache-Control:no-store // useCacheControlNoStore=true时,该设置是防止Firefox缓存
2、cacheSeconds>0时,则将设置如下响应头数据:
Expires:System.currentTimeMillis() + cacheSeconds * 1000L // useExpiresHeader=true时,HTTP 1.0
Cache-Control:max-age=cacheSeconds // useCacheControlHeader=true时,HTTP 1.1
3、cacheSeconds<0时,则什么都不设置,即保留上次的缓存设置。
此处简单说一下以上响应头的作用,缓存控制已超出本书内容:
HTTP1.0缓存控制响应头
Pragma:no-cache:表示防止客户端缓存,需要强制从服务器获取最新的数据;
Expires:HTTP1.0响应头,本地副本缓存过期时间,如果客户端发现缓存文件没有过期则不发送请求,HTTP的日期时间必须是格林威治时间(GMT), 如“Expires:Wed, 14 Mar 2012 09:38:32 GMT”;
HTTP1.1缓存控制响应头
Cache-Control:no-cache 强制客户端每次请求获取服务器的最新版本,不经过本地缓存的副本验证;
Cache-Control:no-store强制客户端不保存请求的副本,该设置是防止Firefox缓存
Cache-Control:max-age=[秒] 客户端副本缓存的最长时间,类似于HTTP1.0的Expires,只是此处是基于请求的相对时间间隔来计算,而非绝对时间。
还有相关缓存控制机制如Last-Modified(最后修改时间验证,客户端的上一次请求时间 在 服务器的最后修改时间 之后,说明服务器数据没有发生变化 返回304状态码)、ETag(没有变化时不重新下载数据,返回304)。
该抽象类默认被AbstractController和WebContentInterceptor继承。
4.4、AbstractController
该抽象类实现了Controller,并继承了WebContentGenerator(具有该类的特性,具体请看4.3),该类有如下属性:
boolean synchronizeOnSession = false:表示该控制器是否在执行时同步session,从而保证该会话的用户串行访问该控制器。
public ModelAndView handleRequest(HttpServletRequest request, HttpServletResponse response) throws Exception {
              //委托给WebContentGenerator进行缓存控制
              checkAndPrepare(request, response, this instanceof LastModified);
              //当前会话是否应串行化访问.
              if (this.synchronizeOnSession) {
                     HttpSession session = request.getSession(false);
                     if (session != null) {
                            Object mutex = WebUtils.getSessionMutex(session);
                            synchronized (mutex) {
                                   return handleRequestInternal(request, response);
                            }
                     }
              }
              return handleRequestInternal(request, response);
}
可以看出AbstractController实现了一些特殊功能,如继承了WebContentGenerator缓存控制功能,并提供了可选的会话的串行化访问功能。而且提供了handleRequestInternal方法,因此我们应该在具体的控制器类中实现handleRequestInternal方法,而不再是handleRequest。
AbstractController使用方法:
首先让我们使用AbstractController来重写第二章的HelloWorldController:
public class HelloWorldController extends AbstractController {
    @Override
    protected ModelAndView handleRequestInternal(HttpServletRequest req, HttpServletResponse resp) throws Exception {
        //1、收集参数
        //2、绑定参数到命令对象
        //3、调用业务对象
        //4、选择下一个页面
        ModelAndView mv = new ModelAndView();
        //添加模型数据 可以是任意的POJO对象
        mv.addObject("message", "Hello World!");
        //设置逻辑视图名,视图解析器会根据该名字解析到具体的视图页面
        mv.setViewName("hello");
        return mv;
    }
}
<!— 在chapter4-servlet.xml配置处理器 -->
<bean name="/hello" class="cn.javass.chapter4.web.controller.HelloWorldController"/>
从如上代码我们可以看出:
1、继承AbstractController
2、实现handleRequestInternal方法即可。
直接通过response写响应
如果我们想直接在控制器通过response写出响应呢,以下代码帮我们阐述:
public class HelloWorldWithoutReturnModelAndViewController extends AbstractController {
    @Override
    protected ModelAndView handleRequestInternal(HttpServletRequest req, HttpServletResponse resp) throws Exception {

        resp.getWriter().write("Hello World!!");
        //如果想直接在该处理器/控制器写响应 可以通过返回null告诉DispatcherServlet自己已经写出响应了,不需要它进行视图解析
        return null;
    }
}
<!— 在chapter4-servlet.xml配置处理器 -->
<bean name="/helloWithoutReturnModelAndView" class="cn.javass.chapter4.web.controller.HelloWorldWithoutReturnModelAndViewController"/>
从如上代码可以看出如果想直接在控制器写出响应,只需要通过response写出,并返回null即可。
强制请求方法类型:
<!— 在chapter4-servlet.xml配置处理器 -->
<bean name="/helloWithPOST" class="cn.javass.chapter4.web.controller.HelloWorldController">
        <property name="supportedMethods" value="POST"></property>
</bean>
以上配置表示只支持POST请求,如果是GET请求客户端将收到“HTTP Status 405 - Request method 'GET' not supported”。
比如注册/登录可能只允许POST请求。
当前请求的session前置条件检查,如果当前请求无session将抛出HttpSessionRequiredException异常:
<!— 在chapter4-servlet.xml配置处理器 -->
<bean name="/helloRequireSession"
class="cn.javass.chapter4.web.controller.HelloWorldController">
        <property name="requireSession" value="true"/>
</bean>
在进入该控制器时,一定要有session存在,否则抛出HttpSessionRequiredException异常。
Session同步:
即同一会话只能串行访问该控制器。
客户端端缓存控制:
1、缓存5秒,cacheSeconds=5
package cn.javass.chapter4.web.controller;
//省略import
public class HelloWorldCacheController extends AbstractController {
    @Override
    protected ModelAndView handleRequestInternal(HttpServletRequest req, HttpServletResponse resp) throws Exception {

        //点击后再次请求当前页面
        resp.getWriter().write("<a href=''>this</a>");
        return null;
    }
}
<!— 在chapter4-servlet.xml配置处理器 -->
<bean name="/helloCache"
class="cn.javass.chapter4.web.controller.HelloWorldCacheController">
<property name="cacheSeconds" value="5"/>
</bean>
如上配置表示告诉浏览器缓存5秒钟:
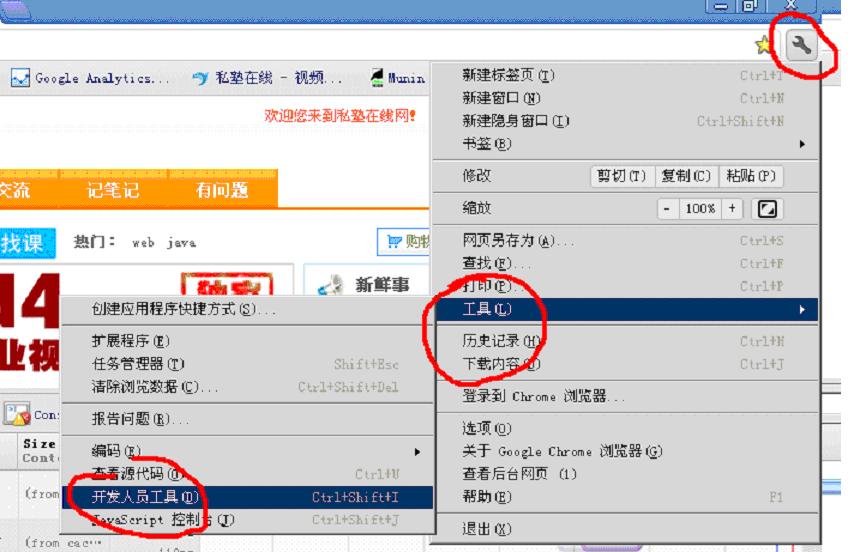
开启chrome浏览器调试工具:
服务器返回的响应头如下所示:
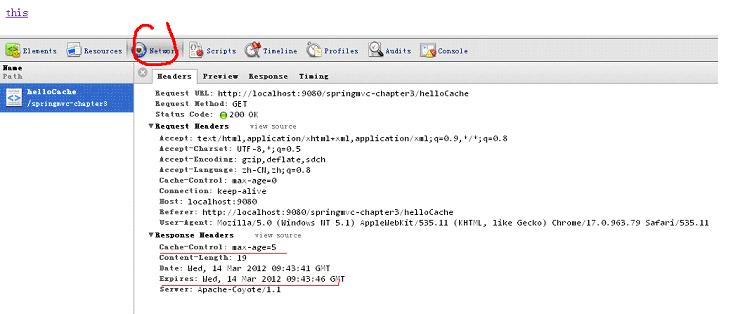
添加了“Expires:Wed, 14 Mar 2012 09:38:32 GMT” 和“Cache-Control:max-age=5” 表示允许客户端缓存5秒,当你点“this”链接时,会发现如下:

而且服务器也没有收到请求,当过了5秒后,你再点“this”链接会发现又重新请求服务器下载新数据。
注:下面提到一些关于缓存控制的一些特殊情况:
1、对于一般的页面跳转(如超链接点击跳转、通过js调用window.open打开新页面都是会使用浏览器缓存的,在未过期情况下会直接使用浏览器缓存的副本,在未过期情况下一次请求也不发送);
2、对于刷新页面(如按F5键刷新),会再次发送一次请求到服务器的;
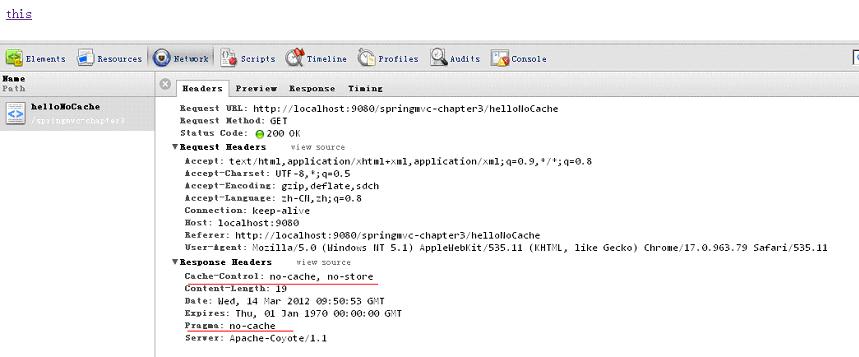
2、不缓存,cacheSeconds=0
<!— 在chapter4-servlet.xml配置处理器 -->
<bean name="/helloNoCache"
class="cn.javass.chapter4.web.controller.HelloWorldCacheController">
<property name="cacheSeconds" value="0"/>
</bean>
以上配置会要求浏览器每次都去请求服务器下载最新的数据:
3、cacheSeconds<0,将不添加任何数据
响应头什么缓存控制信息也不加。
4、Last-Modified缓存机制
(1、在客户端第一次输入url时,服务器端会返回内容和状态码200表示请求成功并返回了内容;同时会添加一个“Last-Modified”的响应头表示此文件在服务器上的最后更新时间,如“Last-Modified:Wed, 14 Mar 2012 10:22:42 GMT”表示最后更新时间为(2012-03-14 10:22);
(2、客户端第二次请求此URL时,客户端会向服务器发送请求头 “If-Modified-Since”,询问服务器该时间之后当前请求内容是否有被修改过,如“If-Modified-Since: Wed, 14 Mar 2012 10:22:42 GMT”,如果服务器端的内容没有变化,则自动返回 HTTP 304状态码(只要响应头,内容为空,这样就节省了网络带宽)。
客户端强制缓存过期:
(1、可以按ctrl+F5强制刷新(会添加请求头 HTTP1.0 Pragma:no-cache和 HTTP1.1 Cache-Control:no-cache、If-Modified-Since请求头被删除)表示强制获取服务器内容,不缓存。
(2、在请求的url后边加上时间戳来重新获取内容,加上时间戳后浏览器就认为不是同一份内容:
http://sishuok.com/?2343243243 和 http://sishuok.com/?34334344 是两次不同的请求。
Spring也提供了Last-Modified机制的支持,只需要实现LastModified接口,如下所示:
package cn.javass.chapter4.web.controller;
public class HelloWorldLastModifiedCacheController extends AbstractController implements LastModified {
    private long lastModified;
    protected ModelAndView handleRequestInternal(HttpServletRequest req, HttpServletResponse resp) throws Exception {
        //点击后再次请求当前页面
        resp.getWriter().write("<a href=''>this</a>");
        return null;
    }
    public long getLastModified(HttpServletRequest request) {
        if(lastModified == 0L) {
            //TODO 此处更新的条件:如果内容有更新,应该重新返回内容最新修改的时间戳
            lastModified = System.currentTimeMillis();
        }
        return lastModified;
    }
}
<!— 在chapter4-servlet.xml配置处理器 -->
<bean name="/helloLastModified"
class="cn.javass.chapter4.web.controller.HelloWorldLastModifiedCacheController"/>
HelloWorldLastModifiedCacheController只需要实现LastModified接口的getLastModified方法,保证当内容发生改变时返回最新的修改时间即可。
分析:
(1、发送请求到服务器,如(http://localhost:9080/springmvc-chapter4/helloLastModified),则服务器返回的响应为:
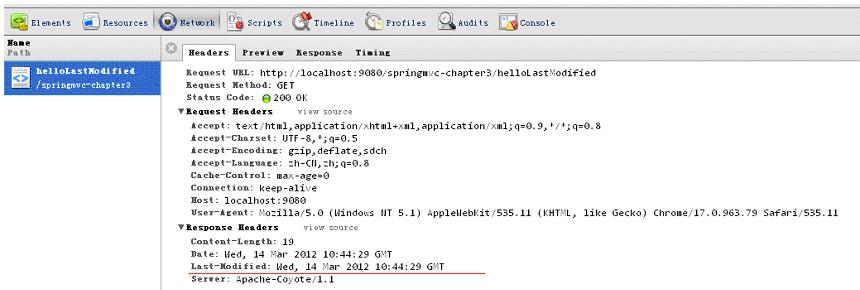
(2、再次按F5刷新客户端,返回状态码304表示服务器没有更新过:

(3、重启服务器,再次刷新,会看到200状态码(因为服务器的lastModified时间变了)。
Spring判断是否过期,通过如下代码,即请求的“If-Modified-Since” 大于等于当前的getLastModified方法的时间戳,则认为没有修改:
this.notModified = (ifModifiedSince >= (lastModifiedTimestamp / 1000 * 1000));
5、ETag(实体标记)缓存机制
(1:浏览器第一次请求,服务器在响应时给请求URL标记,并在HTTP响应头中将其传送到客户端,类似服务器端返回的格式:“ETag:"0f8b0c86fe2c0c7a67791e53d660208e3"”
(2:浏览器第二次请求,客户端的查询更新格式是这样的:“If-None-Match:"0f8b0c86fe2c0c7a67791e53d660208e3"”,如果ETag没改变,表示内容没有发生改变,则返回状态304。
Spring也提供了对ETag的支持,具体需要在web.xml中配置如下代码:
<filter>
   <filter-name>etagFilter</filter-name>
   <filter-class>org.springframework.web.filter.ShallowEtagHeaderFilter</filter-class>
</filter>
<filter-mapping>
   <filter-name>etagFilter</filter-name>
   <servlet-name>chapter4</servlet-name>
</filter-mapping>
此过滤器只过滤到我们DispatcherServlet的请求。
分析:
1):发送请求到服务器:“http://localhost:9080/springmvc-chapter4/hello”,服务器返回的响应头中添加了(ETag:"0f8b0c86fe2c0c7a67791e53d660208e3"):

2):浏览器再次发送请求到服务器(按F5刷新),请求头中添加了“If-None-Match:
"0f8b0c86fe2c0c7a67791e53d660208e3"”,响应返回304代码,表示服务器没有修改,并且响应头再次添加了“ETag:"0f8b0c86fe2c0c7a67791e53d660208e3"”(每次都需要计算):

那服务器端是如何计算ETag的呢?
protected String generateETagHeaderValue(byte[] bytes) {
              StringBuilder builder = new StringBuilder("\"0");
              DigestUtils.appendMd5DigestAsHex(bytes, builder);
              builder.append('"');
              return builder.toString();
}
bytes是response要写回到客户端的响应体(即响应的内容数据),是通过MD5算法计算的内容的摘要信息。也就是说如果服务器内容不发生改变,则ETag每次都是一样的,即服务器端的内容没有发生改变。
此处只列举了部分缓存控制,详细介绍超出了本书的范围,强烈推荐:http://www.mnot.net/cache_docs/(中文版http://www.chedong.com/tech/cache_docs.html) 详细了解HTTP缓存控制及为什么要缓存。
缓存的目的是减少相应延迟 和 减少网络带宽消耗,比如css、js、图片这类静态资源应该进行缓存。
实际项目一般使用反向代理服务器(如nginx、apache等)进行缓存。
[
私塾在线学习网](http://sishuok.com/)原创内容([http://sishuok.com](http://sishuok.com/))
原创内容,转载请注明私塾在线【http://sishuok.com/forum/blogPost/list/0/5234.html】