开发越狱程序和日常开发的iOS程序很相似,不过,越狱程序能做更强大的事情。你的设备越狱之后,你就能够hook进Apple提供的几乎所有的class,来控制iPhone/iPad的功能。
@DHowett的Theos大幅简化了编写越狱程序的流程。DHowett介绍了如何再Mac和Linux上开发iOS越狱程序,本文将只介绍如何在Mac上开发。
本文将一步步介绍写越狱程序需要的工具,在这个过程中介绍Theos的用法和功能。
越狱程序开发需要安装的工具
第1步 安装iOS SDK
从http://developer.apple.com/devcenter/ios/index.action去下载安装最新的Xcode,里面自带有最新的iOS SDK。
第2步 设置环境变量
建议把theos安装在/opt/theos, 打开命令行然后输入
export THEOS=/opt/theos
通过在命令行执行 echo $THEOS可以看到这个变量是否正确设置。如果是这样设置,每次你打开命令行都需要重新设置一下,你也可以编辑/etc/profile文件,把上面那一行添加进去,这样不用每次打开命令行都重新设置一次。
第3步 安装Theos
在命令行中输入:
svn co http://svn.howett.net/svn/theos/trunk $THEOS
会把theos下载到Step2所设置的目录中,会提示你输入admin的密码。
第4步:下载ldid
ldid的作用是模拟给iPhone签名的流程,使得你能够在真实的设备上安装越狱的apps/hacks。
你可以在很多地方都找得到这个tool,不过DHowett在他的dropbox中给大家存了一份。
通过下面的命令下载:
curl -s http://dl.dropbox.com/u/3157793/ldid > ~/Desktop/ldid
chmod +x ~/Desktop/ldid
mv ~/Desktop/ldid $THEOS/bin/ldid
先是下载到桌面,然后改执行权限,然后移动到指定目录。
你可以尝试下看看直接下载是否ok:
curl -s http://dl.dropbox.com/u/3157793/ldid > $THEOS/bin/ldid; chmod +x $THEOS/bin/ldid
由于伟大的墙,下载这个你需要自备梯子。
注:我把这个工具下载下来放到了http://pan.baidu.com/s/1kTHoIGZ,也可以从这里下载,然后给它添加执行权限(chmod +x ldid)并移动到$THEOS/bin/这个目录下。
第5步:安装dkpg
dpkg能够把你的app打包成Debian Package,可以分发的Cydia的存储目录中。
在命令行下执行
brew install dpkg.
也可以用另一个工具Cakebrew来安装dpkg。
第6步:创建新项目
theos使用一个叫做nic(new instance tool)的工具来创建新的工程。执行下面的命令:
$THEOS/bin/nic.pl
就可以开始创建。下面是一个创建jailbroken 应用程序的例子:
author$ $THEOS/bin/nic.pl
NIC 1.0 - New Instance Creator
——————————
  [1.] iphone/application
  [2.] iphone/library
  [3.] iphone/preference_bundle
  [4.] iphone/tool
  [5.] iphone/tweak
Choose a Template (required): 1
Project Name (required): firstdemo
Package Name [com.yourcompany.firstdemo]:
Author/Maintainer Name [Author Name]:
Instantiating iphone/application in firstdemo/…
Done.
简单这样的命令,就创建了一个基本的越狱程序firtdemo,它除了常规的文件外,还包含了Makefile,以及control文件(当在Cydia中时,显示的关于程序的信息)。
构建和部署
下面将介绍如何创建一个jailbroken app/tweak/hack的工具,然后编译和上传到设备的方法。
下面是一个创建jailbroken 应用程序的例子:
author$ $THEOS/bin/nic.pl
NIC 1.0 - New Instance Creator
——————————
  [1.] iphone/application
  [2.] iphone/library
  [3.] iphone/preference_bundle
  [4.] iphone/tool
  [5.] iphone/tweak
Choose a Template (required): 1
Project Name (required): firstdemo
Package Name [com.yourcompany.firstdemo]:
Author/Maintainer Name [Author Name]:
Instantiating iphone/application in firstdemo/…
Done.
这将会创建一个新的目录firstdemo,并且有以下文件。
- control: 包含applicaton/tweak的信息,当你从Cydia安装时,你可以看到这些信息,包括名字,作者,版本,等等。
- main.m,这个不用多说。
- [applicationName]Application.mm:appdelegate文件。
- Makefile:包含必要的编译命令
- Resources:包含info.plist文件等
- RootViewController.h/mm
Makefile
这里重点介绍下:
include theos/makefiles/common.mk
APPLICATION_NAME = firstdemo
[applicationName]_FILES = main.m firstdemoApplication.mm RootViewController.mm
[applicationName]_FRAMEWORKS = UIKit Foundation QuartzCore AudioToolbox CoreGraphics
设置环境变量
打开命令行然后输入
export THEOS=/opt/theos/
export SDKVERSION=7.1
export THEOS_DEVICE_IP=xxx.xxx.xxx.xxx
第二行定义你当前的SDK版本,我本机装的是7.1,最后一行定义你的设备的ip地址。
构建工程
第一个命令:make
$ make
Making all for application firstdemo…
 Compiling main.m…
 Compiling firstdemoApplication.mm…
 Compiling RootViewController.mm…
 Linking application firstdemo…
 Stripping firstdemo…
 Signing firstdemo…
注意,如果出现如下的错误:
libsubstrate.dylib, missing required architecture armv7 in file /Users/mcmillen/test/theos/lib/libsubstrate.dylib (2 slices)
解决方法:
下载libsubstrate.dylib,然后copy到/opt/theos/lib
第二个命令:make package
make package
Making all for application firstdemo…
make[2]: Nothing to be done for ‘internal-application-compile’.
Making stage for application firstdemo…
 Copying resource directories into the application wrapper…
dpkg-deb: building package ‘com.yourcompany.firstdemo’ in ‘/Users/author/Desktop/firstdemo/com.yourcompany.firstdemo_0.0.1-1_iphoneos-arm.deb’.
第三个命令:make install
$ make package install
Making all for application firstdemo…
make[2]: Nothing to be done for `internal-application-compile’.
Making stage for application firstdemo…
 Copying resource directories into the application wrapper…
dpkg-deb: building package ‘com.yourcompany.firstdemo’ in ‘/Users/author/Desktop/firstdemo/com.yourcompany.firstdemo_0.0.1-1_iphoneos-arm.deb’.
...
root@ip’s password:
...
这个过程会提示你输入几次iphone或者ipad的密码。默认是:alpine.
如果执行make install提示错误:
make: *** [internal-install] Error 1
找到文件$THEOS/makefiles/package/deb.mk,把其中的
$(ECHO_NOTHING)COPYFILE_DISABLE=1 $(FAKEROOT) -r dpkg-deb -b "$(THEOS_STAGING_DIR)" "$(_THEOS_DEB_PACKAGE_FILENAME)" $(STDERR_NULL_REDIRECT)$(ECHO_END)
替换为:
$(ECHO_NOTHING)COPYFILE_DISABLE=1 $(FAKEROOT) -r dpkg-deb -Zgzip -b "$(THEOS_STAGING_DIR)" "$(_THEOS_DEB_PACKAGE_FILENAME)" $(STDERR_NULL_REDIRECT)$(ECHO_END)
然后再次执行make install就可以正常安装了。
你的第一个Tweak程序
这一节将介绍如何给任意的Apple提供的方法打补丁。在这个demo中,我们将要hook Springboard的init方法,然后在iphone启动时显示一个UIAlertView。这个demo不是最酷的,但是这里所使用的方法和模式,可以用来给任何class的任何method打补丁。
1 准备工作
你首先还需要下载libsubstrate.dylib,然后copy到/opt/theos/lib
2 iOS 头文件
很可能theos本身就自带了你所需要的头文件,但是,如果你编译程序的时候提示你头文件相关的问题,那你就需要准备相关的头文件了。
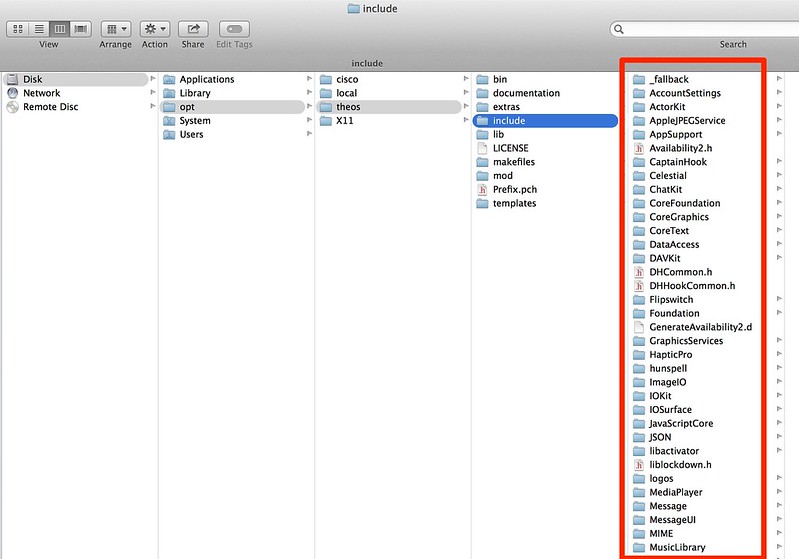
下载iphoneheader到/opt/theos/include:
git clone https://github.com/rpetrich/iphoneheaders.git
mv iphoneheaders/* theos/include/
上述操作之后截图如下:
从OSX library中拷贝IOSurfaceAPI.h到theos/include/IOSurface目录下:
cp /System/Library/Frameworks/IOSurface.framework/Headers/IOSurfaceAPI.h theos/include/IOSurface
给IOSurfaceAPI.h打补丁,注释掉IOSurfaceCreateXPCObject 和IOSurfaceLookupFromXPCObject。
注释后的结果是:
/* This call lets you get an xpc_object_t that holds a reference to the IOSurface.
   Note: Any live XPC objects created from an IOSurfaceRef implicity increase the IOSurface's global use
   count by one until the object is destroyed. */

/*xpc_object_t IOSurfaceCreateXPCObject(IOSurfaceRef aSurface) XPC_RETURNS_RETAINED
    IOSFC_AVAILABLE_STARTING(__MAC_10_7, __IPHONE_NA);*/


/* This call lets you take an xpc_object_t created via IOSurfaceCreatePort() and recreate an IOSurfaceRef from it. */

/*IOSurfaceRef IOSurfaceLookupFromXPCObject(xpc_object_t xobj) CF_RETURNS_RETAINED
    IOSFC_AVAILABLE_STARTING(__MAC_10_7, __IPHONE_NA);
*/
3 创建项目
执行 $THEOS/bin/nic.pl
author$ $THEOS/bin/nic.pl
NIC 1.0 - New Instance Creator
——————————
  [1.] iphone/application
  [2.] iphone/library
  [3.] iphone/preference_bundle
  [4.] iphone/tool
  [5.] iphone/tweak
这里,需要选择5,如下:
NIC 1.0 - New Instance Creator
——————————
  [1.] iphone/application
  [2.] iphone/library
  [3.] iphone/preference_bundle
  [4.] iphone/tool
  [5.] iphone/tweak
Choose a Template (required): 5
Project Name (required): iossecurity
Package Name [com.yourcompany.iossecurity]:
Author/Maintainer Name [Ted]:
MobileSubstrate Bundle filter [com.apple.springboard]:
Instantiating iphone/tweak in iossecurity/…
Done.
4 The Tweak File
一旦你创建了项目,你会发现Theos生成了一个叫做Tweak.xm的文件,这是个特殊的文件,hook的相关代码就将写在这个文件。
默认的所有代码都是被注释起来的。
%hook 和 %end
%hook Springboard
// overwrite methods here
%end
%hook后面跟的是你要hook的类名称,以一个%end结尾。上面的代码说明我们会hook Springboard类里面的method。
%orig
当在一个method内部的时候,%orig会调用原来的方法(original method)。
你甚至可以给原来的method传递参数,例如:%orig(arg1,arg2)。如果你不调用%orig,原来的方法就绝对不会被调用。
所以,如果你hook了SpringBoard的init方法,但是没有调用%orig。那么你的iphone就将不可用,除非你通过ssh删除你的app。
5 Hooking into Springboard
打开Tweak.xm,然后加上代码:
#import <SpringBoard/SpringBoard.h>
%hook SpringBoard
-(void)applicationDidFinishLaunching:(id)application {
%orig;
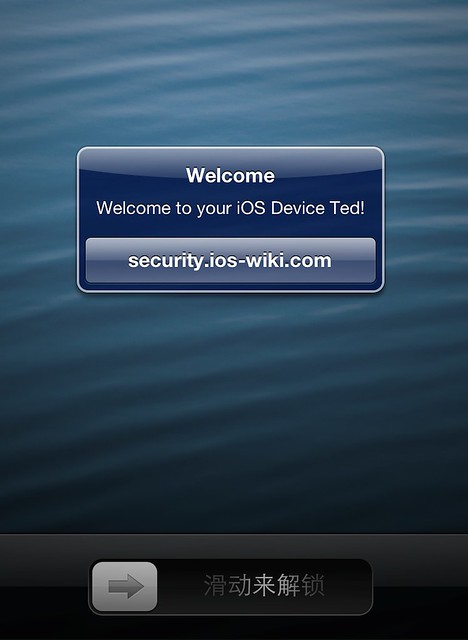
UIAlertView *alert = [[UIAlertView alloc] initWithTitle:@"Welcome"
message:@"Welcome to your iOS Device Ted!"
delegate:nil
cancelButtonTitle:@"security.ios-wiki.com" otherButtonTitles:nil];
[alert show];
[alert release];
}
%end
首先,import头文件 Springboard.h,这可以让我们可以访问springboard。然后,我们告诉预处理器hook Springboard class。
这里覆盖的method是applicationDidFinishLaunching:方法,当Springboard启动时,就会被执行。注意我们调用了%orig。
最后,显示一个UIAlertView。
6 添加Framework
如果你直接编译,,会得到如下的提示信息:
Tweak.xm: In function ‘objc_object* $_ungrouped$SpringBoard$init(SpringBoard*, objc_selector*)’:
Tweak.xm:6: error: declaration of ‘objc_object* self’ shadows a parameter
那是因为我们依靠UIKit framework来显示alert,所以需要在Makefile中加上如下一行:
iossecurity_FRAMEWORKS = UIKit
如下图:

7 Building, Packaging, Installing.
在前面的系列中介绍了如何编译,打包和安装,依次执行下面的命令即可。
make, make package, make install
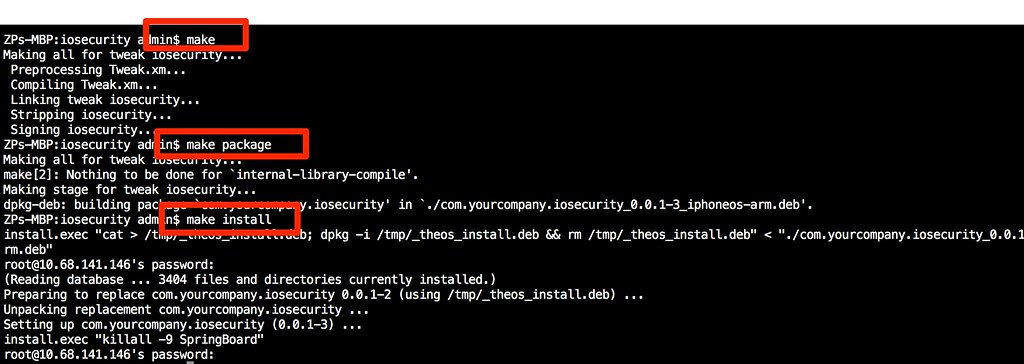
安装之后,你将看到这个:
小结
本节我们简要介绍了Theos的安装与Tweak程序的开发以及安装流程,并给出了一个小例子,后面会对Tweak程序运行的原理进行详细的介绍。