用 React + Redux + Node(Isomorphic JavaScript)开发食谱分享网站
前言
如果你是从一开始跟着我们踏出 React 旅程的读者真的恭喜你,也谢谢你一路跟着我们的学习脚步,对一个初学者来说这一段路并不容易。本章是扣除附录外我们最后一个正式章节的范例,也是规模最大的一个,在这个章节中我们要整合过去所学和添加一些知识开发一个可以登录会员并分享食谱的社群网站, Let's GO!
需求规划
让使用者可以登录会员并分享食谱的社群网站
功能规划
- React Router / Redux / Immutable / Server Render / Async API
- 使用者登录/登出(JSON Web Token)
- CRUD 表单资料处理
- 资料库串接(ORM/MongoDB)
使用技术
- React
- Redux(redux-actions/redux-promise/redux-immutable)
- React Router
- ImmutableJS
- Node MongoDB ORM(Mongoose)
- JSON Web Token
- React Bootstrap
- Axios(Promise)
- Webpack
- UUID
项目成果截图
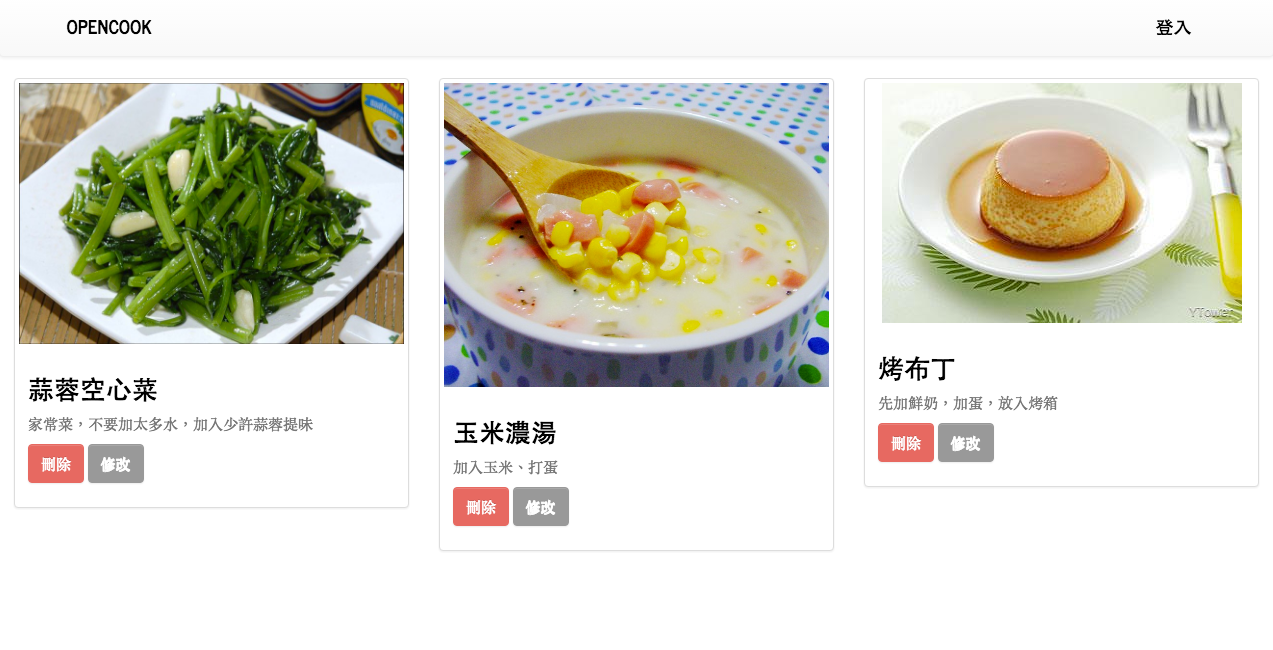
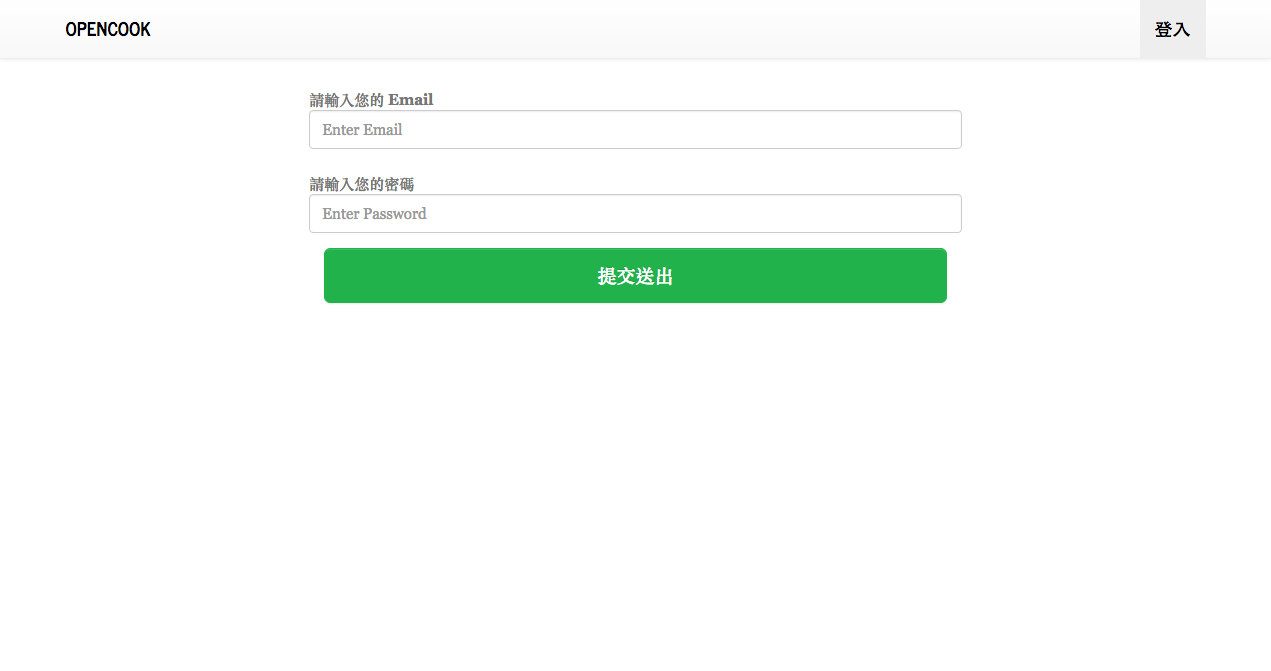
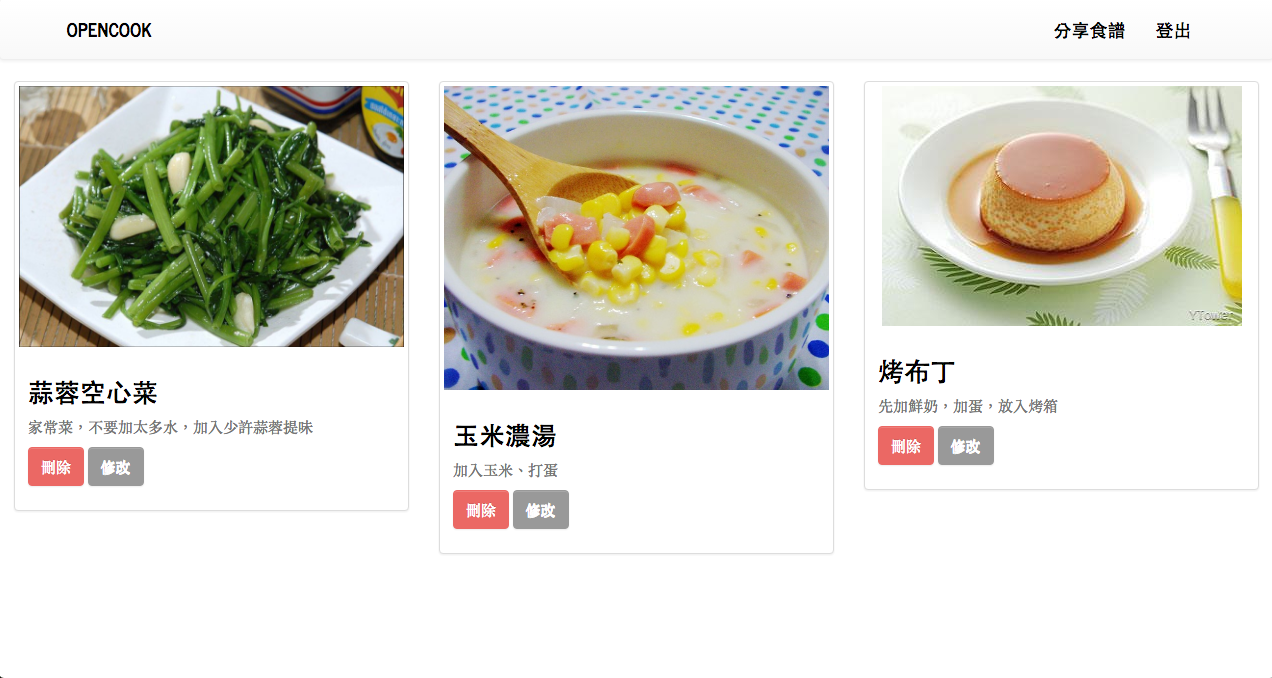
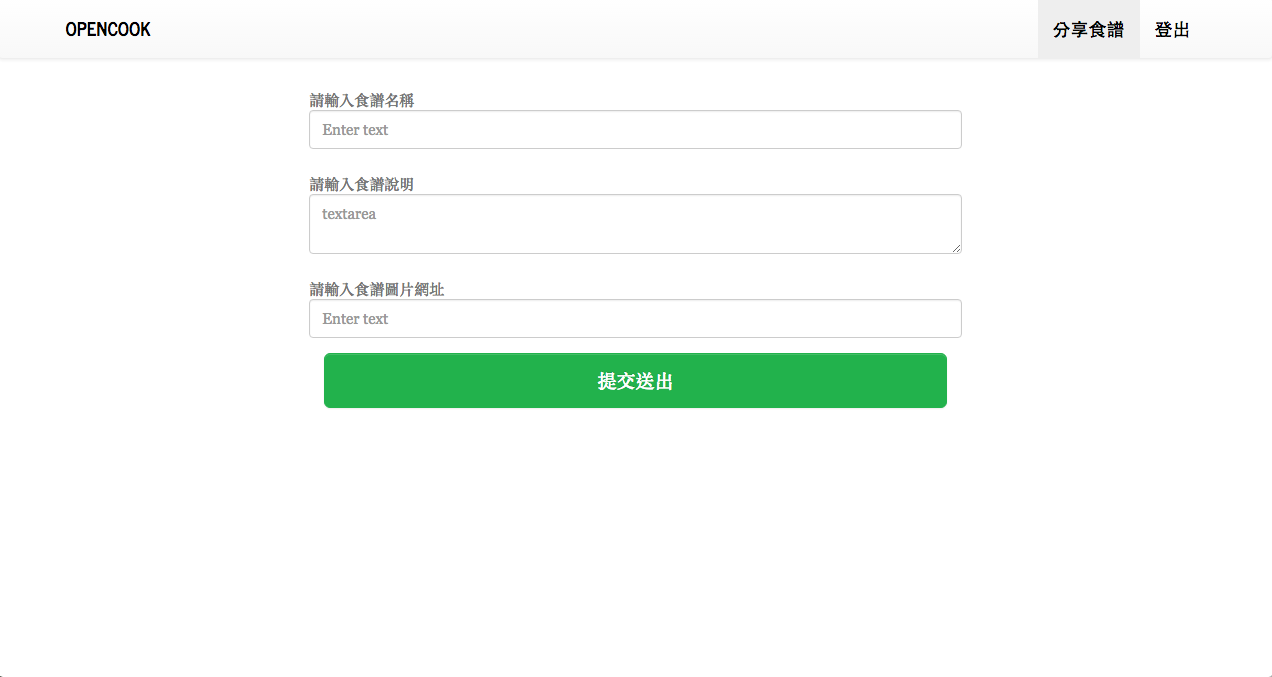
环境安装与设定
安装 Node 和 NPM
安装所需套件
$ npm install --save react react-dom redux react-redux react-router immutable redux-immutable redux-actions redux-promise bcrypt body-parser cookie-parser debug express immutable jsonwebtoken mongoose morgan passport passport-local react-router-bootstrap axios serve-favicon validator uuid
$ npm install --save-dev babel-core babel-eslint babel-loader babel-preset-es2015 babel-preset-react babel-preset-stage-1 eslint eslint-config-airbnb eslint-loader eslint-plugin-import eslint-plugin-jsx-a11y eslint-plugin-react html-webpack-plugin webpack webpack-dev-server redux-logger
接下来我们先设定一下开发文档。
设定 Babel 的设定档:
.babelrc{ "presets": [ "es2015", "react", ], "plugins": [] }设定 ESLint 的设定档和规则:
.eslintrc{ "extends": "airbnb", "rules": { "react/jsx-filename-extension": [1, { "extensions": [".js", ".jsx"] }], }, "env" :{ "browser": true, } }设定 Webpack 设定档:
webpack.config.js:import webpack from 'webpack'; module.exports = { entry: [ './src/client/index.js', ], output: { path: `${__dirname}/dist`, filename: 'bundle.js', publicPath: '/static/' }, module: { preLoaders: [ { test: /\.jsx$|\.js$/, loader: 'eslint-loader', include: `${__dirname}/app`, exclude: /bundle\.js$/, }, ], // 使用 Hot Module Replacement 外挂 plugins: [ new webpack.optimize.OccurrenceOrderPlugin(), new webpack.HotModuleReplacementPlugin() ], loaders: [{ test: /\.js$/, exclude: /node_modules/, loader: 'babel-loader', query: { presets: ['es2015', 'react'], }, }], }, };设定
src/server/config/index.js:
export default ({
  "secret": "ilovecooking",
  "database": "mongodb://localhost/open_cook"
});
太好了!这样我们就完成了开发环境的设定可以开始动手实作我们的食谱分享社群应用程序了!
同时我们也初步设计我们文件夹结构,主要我们将文件夹分为 client、common、server:
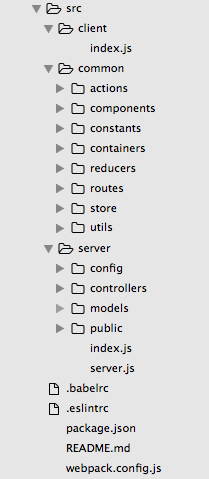
动手实操
首先我们先进行 src/client/index.js 的设计:
import React from 'react';
import ReactDOM from 'react-dom';
import { Provider } from 'react-redux';
import { browserHistory, Router } from 'react-router';
import { fromJS } from 'immutable';
// 我们的 routing 放置在 common 文件夹中的 routes
import routes from '../common/routes';
import configureStore from '../common/store/configureStore';
import { checkAuth } from '../common/actions';

// 将 server side 传过来的 initialState 给 rehydration(覆水)
const initialState = window.__PRELOADED_STATE__;

// 将 initialState 传给 configureStore 函数创建出 store 并传给 Provider
const store = configureStore(fromJS(initialState));
ReactDOM.render(
  <Provider store={store}>
    <Router history={browserHistory} routes={routes} />
  </Provider>,
  document.getElementById('app')
);
由于 Node 端要到新版对于 ES6 支持较好,所以先用 babel-register 在 src/server/index.js 去即时转译 server.js,但不建议在 production 环境使用。
// use babel-register to precompile ES6
require('babel-register');
require('./server');
// 引入 Express、mongoose(MongoDB ORM)以及相关 server 上使用的套件
/* Server Packages */
import Express from 'express';
import bodyParser from 'body-parser';
import cookieParser from 'cookie-parser';
import morgan from 'morgan';
import mongoose from 'mongoose';
import config from './config';
// 引入后端 model 透过 model 和数据库互动
import User from './models/user';
import Recipe from './models/recipe';

// 引入 webpackDevMiddleware 当做前端 server middleware
/* Client Packages */
import webpack from 'webpack';
import React from 'react';
import webpackDevMiddleware from 'webpack-dev-middleware';
import webpackHotMiddleware from 'webpack-hot-middleware';
import { RouterContext, match } from 'react-router';
import { renderToString } from 'react-dom/server';
import { Provider } from 'react-redux';
import Immutable, { fromJS } from 'immutable';
/* Common Packages */
import webpackConfig from '../../webpack.config';
import routes from '../common/routes';
import configureStore from '../common/store/configureStore';
import fetchComponentData from '../common/utils/fetchComponentData';
import apiRoutes from './controllers/api.js';
/* config */
// 初始化 Express server
const app = new Express();
const port = process.env.PORT || 3000;
// 连接到数据库,相关设定档案放在 config.database
mongoose.connect(config.database); // connect to database
app.set('env', 'production');
// 设定静态档案位置
app.use('/static', Express.static(__dirname + '/public'));
app.use(cookieParser());
// use body parser so we can get info from POST and/or URL parameters
app.use(bodyParser.urlencoded({ extended: false })); // only can deal with key/value
app.use(bodyParser.json());
// use morgan to log requests to the console
app.use(morgan('dev'));

// 负责每次接受到 request 的处理函数,判断该如何处理和取得 initialState 整理后结合服务器渲染页面传往前端
const handleRender = (req, res) => {
  // Query our mock API asynchronously
  match({ routes, location: req.url }, (error, redirectLocation, renderProps) => {
    if (error) {
      res.status(500).send(error.message);
    } else if (redirectLocation) {
      res.redirect(302, redirectLocation.pathname + redirectLocation.search);
    } else if (renderProps == null) {
      res.status(404).send('Not found');
    }
    fetchComponentData(req.cookies.token).then((response) => {
      let isAuthorized = false;
      if (response[1].data.success === true) {
         isAuthorized = true;
      } else {
        isAuthorized = false;
      }
      const initialState = fromJS({
        recipe: {
          recipes: response[0].data,
          recipe: {
            id: '',
            name: '',
            description: '',
            imagePath: '',
          }
        },
        user: {
          isAuthorized: isAuthorized,
          isEdit: false,
        }
      });
      // server side 渲染页面
      // Create a new Redux store instance
      const store = configureStore(initialState);
      const initView = renderToString(
        <Provider store={store}>
          <RouterContext {...renderProps} />
        </Provider>
      );
      let state = store.getState();
      let page = renderFullPage(initView, state);
      return res.status(200).send(page);
    })
    .catch(err => res.end(err.message));
  })
}

// 基础页面 HTML 设计
const renderFullPage = (html, preloadedState) => (`
    <!doctype html>
    <html>
      <head>
        <title>OpenCook 分享料理的美好时光</title>
        <!-- Latest compiled and minified CSS -->
        <link rel="stylesheet" href="//maxcdn.bootstrapcdn.com/bootstrap/latest/css/bootstrap.min.css">
        <!-- Optional theme -->
        <link rel="stylesheet" href="//maxcdn.bootstrapcdn.com/bootstrap/latest/css/bootstrap-theme.min.css">
        <link rel="stylesheet" href="//maxcdn.bootstrapcdn.com/bootswatch/3.3.7/journal/bootstrap.min.css">
      <body>
        <div id="app">${html}</div>
        <script>
          window.__PRELOADED_STATE__ = ${JSON.stringify(preloadedState).replace(/</g, '\\x3c')}
        </script>
        <script src="/static/bundle.js"></script>
      </body>
    </html>`
);

// 设定 hot reload middleware
const compiler = webpack(webpackConfig);
app.use(webpackDevMiddleware(compiler, { noInfo: true, publicPath: webpackConfig.output.publicPath }));
app.use(webpackHotMiddleware(compiler));

// 设计 API prefix,并使用 controller 中的 apiRoutes 进行处理
app.use('/api', apiRoutes);
// 使用服务器端 handleRender
app.use(handleRender);
app.listen(port, (error) => {
  if (error) {
    console.error(error)
  } else {
    console.info(`==> 🌎  Listening on port ${port}. Open up http://localhost:${port}/ in your browser.`)
  }
});
由于 Node 端要到新版对于 ES6 支持较好,所以先用 babel-register 在 src/server/index.js 去即时转译 server.js,但目前不建议在 production 环境使用。
// use babel-register to precompile ES6 syntax
require('babel-register');
require('./server');
现在我们来设计一下我们数据库的 Schema,在这边我们使用 MongoDB 的 ORM Mongoose,可以方便我们使用物件方式进行资料库的操作:
// 引入 mongoose 和 Schema
import mongoose, { Schema } from 'mongoose';

// 使用 mongoose.model 建立新的资料表,并将 Schema 传入
// 这边我们设计了食谱分享的一些基本要素,包括名称、描述、照片位置等
export default mongoose.model('Recipe', new Schema({
    id: String,
    name: String,
    description: String,
    imagePath: String,
    steps: Array,
    updatedAt: Date,
}));
// 引入 mongoose 和 Schema
import mongoose, { Schema } from 'mongoose';

// 使用 mongoose.model 建立新的数据表,并将 Schema 传入
// 这边我们设计了使用者的一些基本要素,包括名称、描述、照片位置等
export default mongoose.model('User', new Schema({
    id: Number,
    username: String,
    email: String,
    password: String,
    admin: Boolean
}));
为了方便维护,我们把 API 的部份统一在 src/server/controllers/api.js 进行管理,这部份会涉及比较多 Node 和 mongoose 的操作,若读者尚不熟悉可以参考 mongoose 官网
import Express from 'express';
// 引入 jsonwebtoken 套件
import jwt from 'jsonwebtoken';
// 引入 User、Recipe Model 方便进行资料库操作
import User from '../models/user';
import Recipe from '../models/recipe';
import config from '../config';

// API Route
const app = new Express();
const apiRoutes = Express.Router();
// 设定 JSON Web Token 的 secret variable
app.set('superSecret', config.secret); // secret variable
// 使用者登录 API ,依据使用 email 和 密码去验证,若成功则回传一个认证 token(时效24小时)我们把它存在 cookie 中,方便前后端存取。这边我们先不考虑太多信息安全的问题
apiRoutes.post('/login', function(req, res) {
  // find the user
  User.findOne({
    email: req.body.email
  }, (err, user) => {
    if (err) throw err;
    if (!user) {
      res.json({ success: false, message: 'Authentication failed. User not found.' });
    } else if (user) {
      // check if password matches
      if (user.password != req.body.password) {
        res.json({ success: false, message: 'Authentication failed. Wrong password.' });
      } else {
        // if user is found and password is right
        // create a token
        const token = jwt.sign({ email: user.email }, app.get('superSecret'), {
          expiresIn: 60 * 60 * 24 // expires in 24 hours
        });
        // return the information including token as JSON
        // 若登录成功回传一个 json 讯息
        res.json({
          success: true,
          message: 'Enjoy your token!',
          token: token,
          userId: user._id
        });
      }
    }
  });
});
// 初始化 api,一开始数据库尚未建立任何使用者,我们需要在浏览器输入 `http://localhost:3000/api/setup`,进行数据库初始化。这个动作将新增一个使用者、一份食谱,若是成功新增将回传一个 success 讯息
apiRoutes.get('/setup', (req, res) => {
  // create a sample user
  const sampleUser = new User({
    username: 'mark',
    email: '[email protected]',
    password: '123456',
    admin: true
  });
  const sampleRecipe = new Recipe({
    id: '110ec58a-a0f2-4ac4-8393-c866d813b8d1',
    name: '番茄炒蛋',
    description: '番茄炒蛋,一道非常经典的家常菜料理。虽然看似普通,但每个家庭都有属于自己家里的不同味道',
    imagePath: 'https://c1.staticflickr.com/6/5011/5510599760_6668df5a8a_z.jpg',
    steps: ['放入番茄', '打个蛋', '放入少许盐巴', '用心快炒'],
    updatedAt: new Date()
  });
  // save the sample user
  sampleUser.save((err) => {
    if (err) throw err;
    sampleRecipe.save((err) => {
      if (err) throw err;
      console.log('User saved successfully');
      res.json({ success: true });
    })
  });
});
// 回传所有 recipes
apiRoutes.get('/recipes', (req, res) => {
  Recipe.find({}, (err, recipes) => {
    res.status(200).json(recipes);
  })
});

// route middleware to verify a token
// 接下来的 api 将进行控管,也就是说必须在网址请求中夹带认证 token 才能完成请求
apiRoutes.use((req, res, next) => {
  // check header or url parameters or post parameters for token
  // 确认标头、网址或 post 参数是否含有 token,本范例因为简便使用网址 query 参数
  var token = req.body.token || req.query.token || req.headers['x-access-token'];
  // decode token
  if (token) {
    // verifies secret and checks exp
    jwt.verify(token, app.get('superSecret'), (err, decoded) => {
      if (err) {
        return res.json({ success: false, message: 'Failed to authenticate token.' });
      } else {
        // if everything is good, save to request for use in other routes
        req.decoded = decoded;
        next();
      }
    });
  } else {
    // if there is no token
    // return an error
    return res.status(403).send({
        success: false,
        message: 'No token provided.'
    });
  }
});
// 确认认证是否成功
apiRoutes.get('/authenticate', (req, res) => {
  res.json({
    success: true,
    message: 'Enjoy your token!',
  });
});
// create recipe 新增食谱
apiRoutes.post('/recipes', (req, res) => {
  const newRecipe = new Recipe({
    name: req.body.name,
    description: req.body.description,
    imagePath: req.body.imagePath,
    steps: ['放入番茄', '打个蛋', '放入少许盐巴', '用心快炒'],
    updatedAt: new Date()
  });
  newRecipe.save((err) => {
    if (err) throw err;
    console.log('User saved successfully');
    res.json({ success: true });
  });
});
// update recipe 根据 _id(mongodb 的 id)更新食谱
apiRoutes.put('/recipes/:id', (req, res) => {
  Recipe.update({ _id: req.params.id }, {
    name: req.body.name,
    description: req.body.description,
    imagePath: req.body.imagePath,
    steps: ['放入番茄', '打个蛋', '放入少许盐巴', '用心快炒'],
    updatedAt: new Date()
  } ,(err) => {
    if (err) throw err;
    console.log('User updated successfully');
    res.json({ success: true });
  });
});
// remove recipe 根据 _id 删除食谱,若成功回传成功讯息
apiRoutes.delete('/recipes/:id', (req, res) => {
  Recipe.remove({ _id: req.params.id }, (err, recipe) => {
    if (err) throw err;
    console.log('remove saved successfully');
    res.json({ success: true });
  });
});
export default apiRoutes;
设定整个 App 的 routing,我们主要页面有 HomePageContainer、LoginPageContainer、SharePageContainer,值得注意的是我们这边使用 Higher Order Components (Higher Order Components 为一个函数, 接收一个 Component 后在 Class Component 的 render 中 return 回传入的 components)方式去确认使用者是否有登录,若有没登录则不能进入分享食谱页面,反之若已登录也不会再进到登录页面:
import React from 'react';
import { Route, IndexRoute } from 'react-router';
import Main from '../components/Main';
import CheckAuth from '../components/CheckAuth';
import HomePageContainer from '../containers/HomePageContainer';
import LoginPageContainer from '../containers/LoginPageContainer';
import SharePageContainer from '../containers/SharePageContainer';

export default (
  <Route path='/' component={Main}>
    <IndexRoute component={HomePageContainer} />
    <Route path="/login" component={CheckAuth(LoginPageContainer, 'guest')}/>
    <Route path="/share" component={CheckAuth(SharePageContainer, 'auth')}/>
  </Route>
);
设定行为常数(src/constants/actionTypes.js):
export const AUTH_START    = "AUTH_START";
export const AUTH_COMPLETE = "AUTH_COMPLETE";
export const AUTH_ERROR    = "AUTH_ERROR";
export const START_LOGOUT    = "START_LOGOUT";
export const CHECK_AUTH    = "CHECK_AUTH";
export const SET_USER    = "SET_USER";
export const SHOW_SPINNER    = "SHOW_SPINNER";
export const HIDE_SPINNER    = "HIDE_SPINNER";
export const SET_UI    = "SET_UI";
export const GET_RECIPES = 'GET_RECIPES';
export const SET_RECIPE = 'SET_RECIPE';
export const ADD_RECIPE = 'ADD_RECIPE';
export const UPDATE_RECIPE = 'UPDATE_RECIPE';
export const DELETE_RECIPE = 'DELETE_RECIPE';
设定 src/actions/recipeActions.js,我们这边使用 redux-promise,可以很容易使用非同步的行为 WebAPI:
import { createAction } from 'redux-actions';
import WebAPI from '../utils/WebAPI';

import {
  GET_RECIPES,
  ADD_RECIPE,
  UPDATE_RECIPE,
  DELETE_RECIPE,
  SET_RECIPE,
} from '../constants/actionTypes';

export const getRecipes = createAction('GET_RECIPES', WebAPI.getRecipes);
export const addRecipe = createAction('ADD_RECIPE', WebAPI.addRecipe);
export const updateRecipe = createAction('UPDATE_RECIPE', WebAPI.updateRecipe);
export const deleteRecipe = createAction('DELETE_RECIPE', WebAPI.deleteRecipe);
export const setRecipe = createAction('SET_RECIPE');
设定 src/actions/uiActions.js:
import { createAction } from 'redux-actions';
import WebAPI from '../utils/WebAPI';

import {
  SHOW_SPINNER,
  HIDE_SPINNER,
  SET_UI,
} from '../constants/actionTypes';

export const showSpinner = createAction('SHOW_SPINNER');
export const hideSpinner = createAction('HIDE_SPINNER');
export const setUi = createAction('SET_UI');
设定 src/actions/userActions.js,处理使用者登录登出等行为:
import { createAction } from 'redux-actions';
import WebAPI from '../utils/WebAPI';

import {
  AUTH_START,
  AUTH_COMPLETE,
  AUTH_ERROR,
  START_LOGOUT,
  CHECK_AUTH,
  SET_USER
} from '../constants/actionTypes';

export const authStart = createAction('AUTH_START', WebAPI.login);
export const authComplete = createAction('AUTH_COMPLETE');
export const authError = createAction('AUTH_ERROR');
export const startLogout = createAction('START_LOGOUT', WebAPI.logout);
export const checkAuth = createAction('CHECK_AUTH');
export const setUser = createAction('SET_USER');
于 scr/actions/index.js 输出 actions:
export * from './userActions';
export * from './recipeActions';
export * from './uiActions';
于 scr/common/utils/fetchComponentData.js 设定 server side 初始 fetchComponentData:
// 这边使用 axios 方便进行 promises base request
import axios from 'axios';
// 记得附加上我们存在 cookies 的 token
export default function fetchComponentData(token = 'token') {
  const promises = [axios.get('http://localhost:3000/api/recipes'), axios.get('http://localhost:3000/api/authenticate?token=' + token)];
  return Promise.all(promises);
}
于 scr/common/utils/WebAPI.js 所有前端 API 的处理:
import axios from 'axios';
import { browserHistory } from 'react-router';
// 引入 uuid 当做食谱 id
import uuid from 'uuid';

import {
  authComplete,
  authError,
  hideSpinner,
  completeLogout,
} from '../actions';

// getCookie 函数传入 key 回传 value
function getCookie(keyName) {
  var name = keyName + '=';
  const cookies = document.cookie.split(';');
  for(let i = 0; i < cookies.length; i++) {
      let cookie = cookies[i];
      while (cookie.charAt(0)==' ') {
          cookie = cookie.substring(1);
      }
      if (cookie.indexOf(name) == 0) {
        return cookie.substring(name.length, cookie.length);
      }
  }
  return "";
}

export default {
  // 呼叫后端登录 api
  login: (dispatch, email, password) => {
    axios.post('/api/login', {
      email: email,
      password: password
    })
    .then((response) => {
      if(response.data.success === false) {
        dispatch(authError());
        dispatch(hideSpinner());
        alert('发生错误,请再试一次!');
        window.location.reload();
      } else {
        if (!document.cookie.token) {
          let d = new Date();
          d.setTime(d.getTime() + (24 * 60 * 60 * 1000));
          const expires = 'expires=' + d.toUTCString();
          document.cookie = 'token=' + response.data.token + '; ' + expires;
          dispatch(authComplete());
          dispatch(hideSpinner());
          browserHistory.push('/');
        }
      }
    })
    .catch(function (error) {
      dispatch(authError());
    });
  },
  // 呼叫后端登出 api
  logout: (dispatch) => {
    document.cookie = 'token=; ' + 'expires=Thu, 01 Jan 1970 00:00:01 GMT;';
    dispatch(hideSpinner());
    browserHistory.push('/');
  },
  // 确认使用者是否登录
  checkAuth: (dispatch, token) => {
    axios.post('/api/authenticate', {
      token: token,
    })
    .then((response) => {
      if(response.data.success === false) {
        dispatch(authError());
      } else {
        dispatch(authComplete());
      }
    })
    .catch(function (error) {
      dispatch(authError());
    });
  },
  // 取得目前所有食谱
  getRecipes: () => {
    axios.get('/api/recipes')
    .then((response) => {
    })
    .catch((error) => {
    });
  },
  // 呼叫新增食谱 api,记得附加上我们存在 cookies 的 token
  addRecipe: (dispatch, name, description, imagePath) => {
    const id = uuid.v4();
    axios.post('/api/recipes?token=' + getCookie('token'), {
      id: id,
      name: name,
      description: description,
      imagePath: imagePath,
    })
    .then((response) => {
      if(response.data.success === false) {
        dispatch(hideSpinner());
        alert('发生错误,请再试一次!');
        browserHistory.push('/share');
      } else {
        dispatch(hideSpinner());
        window.location.reload();
        browserHistory.push('/');
      }
    })
    .catch(function (error) {
    });
  },
  // 呼叫更新食谱 api,记得附加上我们存在 cookies 的 token
  updateRecipe: (dispatch, recipeId, name, description, imagePath) => {
    axios.put('/api/recipes/' + recipeId + '?token=' + getCookie('token'), {
      id: recipeId,
      name: name,
      description: description,
      imagePath: imagePath,
    })
    .then((response) => {
      if(response.data.success === false) {
        dispatch(hideSpinner());
        dispatch(setRecipe({ key: 'recipeId', value: '' }));
        dispatch(setUi({ key: 'isEdit', value: false }));
        alert('发生错误,请再试一次!');
        browserHistory.push('/share');
      } else {
        dispatch(hideSpinner());
        window.location.reload();
        browserHistory.push('/');
      }
    })
    .catch(function (error) {
    });
  },
  // 呼叫删除食谱 api,记得附加上我们存在 cookies 的 token
  deleteRecipe: (dispatch, recipeId) => {
    axios.delete('/api/recipes/' + recipeId + '?token=' + getCookie('token'))
    .then((response) => {
      if(response.data.success === false) {
        dispatch(hideSpinner());
        alert('发生错误,请再试一次!');
        browserHistory.push('/');
      } else {
        dispatch(hideSpinner());
        window.location.reload();
        browserHistory.push('/');
      }
    })
    .catch(function (error) {
    });
  }
};
接下来设定我们的 reducers,以下是 src/common/reducers/data/recipeReducers.js,GET_RECIPES 负责将后端 API 取得的所有食谱存放在 recipes 中:
import { handleActions } from 'redux-actions';
import { RecipeState } from '../../constants/models';

import {
  GET_RECIPES,
  SET_RECIPE,
} from '../../constants/actionTypes';

const recipeReducers = handleActions({
  GET_RECIPES: (state, { payload }) => (
    state.set(
      'recipes',
      payload.recipes
    )
  ),
  SET_RECIPE: (state, { payload }) => (
    state.setIn(payload.keyPath, payload.value)
  ),
}, RecipeState);

export default recipeReducers;
以下是 src/common/reducers/data/userReducers.js,负责确认登录相关处理事项。注意的是由于登录是非同步执行,所以会有几个阶段的行为要做处理:
import { handleActions } from 'redux-actions';
import { UserState } from '../../constants/models';

import {
  AUTH_START,
  AUTH_COMPLETE,
  AUTH_ERROR,
  LOGOUT_START,
  SET_USER,
} from '../../constants/actionTypes';

const userReducers = handleActions({
  AUTH_START: (state) => (
    state.merge({
      isAuthorized: false,
    })
  ),
  AUTH_COMPLETE: (state) => (
    state.merge({
      email: '',
      password: '',
      isAuthorized: true,
    })
  ),
  AUTH_ERROR: (state) => (
    state.merge({
      username: '',
      email: '',
      password: '',
      isAuthorized: false,
    })
  ),
  START_LOGOUT: (state) => (
    state.merge({
      isAuthorized: false,
    })
  ),
  CHECK_AUTH: (state) => (
    state.set('isAuthorized', true)
  ),
  SET_USER: (state, { payload }) => (
    state.set(payload.key, payload.value)
  ),
}, UserState);

export default userReducers;
以下是 src/common/reducers/ui/uiReducers.js,负责确认 UI State 相关处理:
import { handleActions } from 'redux-actions';
import { UiState } from '../../constants/models';

import {
  SHOW_SPINNER,
  HIDE_SPINNER,
  SET_UI,
} from '../../constants/actionTypes';

const uiReducers = handleActions({
  SHOW_SPINNER: (state) => (
    state.set(
      'spinnerVisible',
      true
    )
  ),
  HIDE_SPINNER: (state) => (
    state.set(
      'spinnerVisible',
      false
    )
  ),
  SET_UI: (state, { payload }) => (
    state.set(payload.key, payload.value)
  ),
}, UiState);

export default uiReducers;
最后把所有 recipes 在 src/common/reducers/index.js 使用 combineReducers 整合在一起,注意的是我们整个 App 的资料流要维持 immutable:
import { combineReducers } from 'redux-immutable';
import ui from './ui/uiReducers';
import recipe from './data/recipeReducers';
import user from './data/userReducers';
// import routes from './routes';

const rootReducer = combineReducers({
  ui,
  recipe,
  user,
});

export default rootReducer;
以下是 src/common/store/configureStore.js 处理 store 的建立,这次我们使用了 promiseMiddleware 的 middleware:
import { createStore, applyMiddleware } from 'redux';
import promiseMiddleware from 'redux-promise';
import createLogger from 'redux-logger';
import Immutable from 'immutable';
import rootReducer from '../reducers';

const initialState = Immutable.Map();

export default function configureStore(preloadedState = initialState) {
  const store = createStore(
    rootReducer,
    preloadedState,
    applyMiddleware(createLogger({ stateTransformer: state => state.toJS() }, promiseMiddleware))
  );

  return store;
}
经过一连串努力,我们来到了 View 的布建。在这个 App 中我们主要会由一个 AppBar 负责所有页面的导览,也就是每个页面都会有 AppBar 常驻在上面,然而上面的内容则会依 UI State 中的 isAuthorized 而有所不同。最后要留意的是我们使用了 React Bootstrapt 来建立 React Component。
import React from 'react';
import { LinkContainer } from 'react-router-bootstrap';
import { Link } from 'react-router';
import { Navbar, Nav, NavItem, NavDropdown, MenuItem } from 'react-bootstrap';

const AppBar = ({
  isAuthorized,
  onToShare,
  onLogout,
}) => (
  <Navbar>
    <Navbar.Header>
      <Navbar.Brand>
        <Link to="/">OpenCook</Link>
      </Navbar.Brand>
      <Navbar.Toggle />
    </Navbar.Header>
    <Navbar.Collapse>
      {
        isAuthorized === false ?
        (
          <Nav pullRight>
            <LinkContainer to={{ pathname: '/login' }}><NavItem eventKey={2} href="#">登录</NavItem></LinkContainer>
          </Nav>
        ) :
        (
          <Nav pullRight>
            <NavItem eventKey={1} onClick={onToShare}>分享食谱</NavItem>
            <NavItem eventKey={2} onClick={onLogout} href="#">登出</NavItem>
          </Nav>
        )
      }
    </Navbar.Collapse>
  </Navbar>
);

export default AppBar;
以下是 src/common/containers/AppBarContainer/AppBarContainer.js:
import React from 'react';
import { connect } from 'react-redux';
import AppBar from '../../components/AppBar';
import { browserHistory } from 'react-router';

import {
  startLogout,
  setRecipe,
  setUi,
} from '../../actions';

export default connect(
  (state) => ({
    isAuthorized: state.getIn(['user', 'isAuthorized']),
  }),
  (dispatch) => ({
    onToShare: () => {
      dispatch(setRecipe({ key: 'recipeId', value: '' }));
      dispatch(setUi({ key: 'isEdit', value: false }));
      window.location.reload();
      browserHistory.push('/share');
    },
    onLogout: () => (
      dispatch(startLogout(dispatch))
    ),
  })
)(AppBar);
以下是 src/components/Main/Main.js,透过 route 机制让 AppBarContainer 可以成为整个 App 母模版:
import React from 'react';
import AppBarContainer from '../../containers/AppBarContainer';

const Main = (props) => (
  <div>
    <AppBarContainer />
    <div>
      {props.children}
    </div>
  </div>
);

export default Main;
在 checkAuth 这个 Component 中,我们使用到了 Higher Order Components 的观念。Higher Order Components 为一个函数, 接收一个 Component 后在 Class Component 的 render 中 return 回传入的 components 方式去确认使用者是否有登录,若有没登录则不能进入分享食谱页面,反之若已登录也不会再进到登录页面:
import React from 'react';
import { connect } from 'react-redux';
import { withRouter } from 'react-router';

// High Order Component
export default function requireAuthentication(Component, type) {
  class AuthenticatedComponent extends React.Component {
    componentWillMount() {
      this.checkAuth();
    }
    componentWillReceiveProps(nextProps) {
      this.checkAuth();
    }
    checkAuth() {
      if(type === 'auth') {
        if (!this.props.isAuthorized) {
          this.props.router.push('/');
        }
      } else {
        if (this.props.isAuthorized) {
          this.props.router.push('/');
        }
      }
    }
    render() {
      return (
        <div>
        {
          (type === 'auth') ?
          this.props.isAuthorized === true ? <Component {...this.props } /> : null
          : this.props.isAuthorized === false ? <Component {...this.props } /> : null
        }
        </div>
      )
    }
  };
  const mapStateToProps = (state) => ({
    isAuthorized: state.getIn(['user', 'isAuthorized']),
  });
  return connect(mapStateToProps)(withRouter(AuthenticatedComponent));
}
我们将每个食谱呈现设计成 RecipeBox,以下是在 src/common/components/HomePage/HomePage.js 使用 map 方法去迭代我们的食谱:
import React from 'react';
import RecipeBoxContainer from '../../containers/RecipeBoxContainer';

const HomePage = ({
  recipes
}) => (
  <div>
  {
    recipes.map((recipe, index) => (
      <RecipeBoxContainer recipe={recipe} key={index}  />
    )).toJS()
  }
  </div>
);

export default HomePage;
以下是 src/common/containers/HomePageContainer/HomePageContainer.js:
import React from 'react';
import { connect } from 'react-redux';
import HomePage from '../../components/HomePage';

export default connect(
  (state) => ({
    recipes: state.getIn(['recipe', 'recipes']),
  }),
  (dispatch) => ({
  })
)(HomePage);
在 src/common/components/LoginBox/LoginBox.js 设计我们 LoginBox:
import React from 'react';
import { Form, FormGroup, Button, FormControl, ControlLabel } from 'react-bootstrap';

const LoginBox = ({
  email,
  password,
  onChangeEmailInput,
  onChangePasswordInput,
  onLoginSubmit
}) => (
  <div>
    <Form horizontal>
      <FormGroup
        controlId="formBasicText"
      >
        <ControlLabel>请输入您的 Email</ControlLabel>
        <FormControl
          type="text"
          onChange={onChangeEmailInput}
          placeholder="Enter Email"
        />
        <FormControl.Feedback />
      </FormGroup>
      <FormGroup
        controlId="formBasicText"
      >
        <ControlLabel>请输入您的密码</ControlLabel>
        <FormControl
          type="password"
          onChange={onChangePasswordInput}
          placeholder="Enter Password"
        />
        <FormControl.Feedback />
      </FormGroup>
      <Button
        onClick={onLoginSubmit}
        bsStyle="success"
        bsSize="large"
        block
      >
        提交送出
      </Button>
    </Form>
  </div>
);

export default LoginBox;
以下是 src/common/containers/LoginBoxContainer/LoginBoxContainer.js:
import React from 'react';
import { connect } from 'react-redux';
import LoginBox from '../../components/LoginBox';

import {
  authStart,
  showSpinner,
  setUser,
} from '../../actions';

export default connect(
  (state) => ({
    email: state.getIn(['user', 'email']),
    password: state.getIn(['user', 'password']),
  }),
  (dispatch) => ({
    onChangeEmailInput: (event) => (
      dispatch(setUser({ key: 'email', value: event.target.value }))
    ),
    onChangePasswordInput: (event) => (
      dispatch(setUser({ key: 'password', value: event.target.value }))
    ),
    onLoginSubmit: (email, password) => () => {
      dispatch(authStart(dispatch, email, password));
      dispatch(showSpinner());
    },
  }),
  (stateProps, dispatchProps, ownProps) => {
    const { email, password } = stateProps;
    const { onLoginSubmit } = dispatchProps;
    return Object.assign({}, stateProps, dispatchProps, ownProps, {
      onLoginSubmit: onLoginSubmit(email, password),
    });
  }
)(LoginBox);
在 src/common/components/LoginPage/LoginPage.js,当 spinnerVisible 为 true 会显示 spinner:
import React from 'react';
import { Grid, Row, Col, Image } from 'react-bootstrap';
import LoginBoxContainer from '../../containers/LoginBoxContainer';

const LoginPage = ({
  spinnerVisible,
}) => (
  <div>
    <Row className="show-grid">
      <Col xs={6} xsOffset={3}>
        <LoginBoxContainer />
        { spinnerVisible === true ?
          <Image src="/static/images/loading.gif" /> :
          null
        }
      </Col>
    </Row>
  </div>
);

export default LoginPage;
以下是 src/common/containers/LoginPageContainer/LoginPageContainer.js:
import React from 'react';
import { connect } from 'react-redux';
import LoginPage from '../../components/LoginPage';

export default connect(
  (state) => ({
    spinnerVisible: state.getIn(['ui', 'spinnerVisible']),
  }),
  (dispatch) => ({
  })
)(LoginPage);
真正设计我们内部的食谱, src/common/components/RecipeBox,使用者登录的话可以修改和删除食谱:
import React from 'react';
import { Grid, Row, Col, Image, Thumbnail, Button } from 'react-bootstrap';
const RecipeBox = (props) => {
return(
<Col xs={6} md={4}>
<Thumbnail src={props.recipe.get('imagePath')} alt="242x200">
<h3>{props.recipe.get('name')}</h3>
<p>{props.recipe.get('description')}</p>
{
props.isAuthorized === true ? (
<p>
<Button bsStyle="primary" onClick={props.onDeleteRecipe(props.recipe.get('_id'))}>删除</Button>
<Button bsStyle="default" onClick={props.onUpadateRecipe(props.recipe.get('_id'))}>修改</Button>
</p>)
: null
}
</Thumbnail>
</Col>
);
}
export default RecipeBox;
以下是 src/common/containers/RecipeBoxContainer/RecipeBoxContainer.js:
import React from 'react';
import { connect } from 'react-redux';
import RecipeBox from '../../components/RecipeBox';
import { browserHistory } from 'react-router';

import {
  deleteRecipe,
  setRecipe,
  setUi
} from '../../actions';

export default connect(
  (state) => ({
    isAuthorized: state.getIn(['user', 'isAuthorized']),
    recipes: state.getIn(['recipe', 'recipes']),
  }),
  (dispatch) => ({
    onDeleteRecipe: (recipeId) => () => (
      dispatch(deleteRecipe(dispatch, recipeId))
    ),
    onUpadateRecipe: (recipes) => (recipeId) => () => {
      const recipeIndex = recipes.findIndex((_recipe) => (_recipe.get('_id') === recipeId));
      const recipe = recipeIndex !== -1 ? recipes.get(recipeIndex) : undefined;
      dispatch(setRecipe({ keyPath: ['recipe'], value: recipe }));
      dispatch(setRecipe({ keyPath: ['recipe', 'id'], value: recipeId }));
      dispatch(setUi({ key: 'isEdit', value: true }));
      browserHistory.push('/share?recipeId=' + recipeId);
    },
  }),
  (stateProps, dispatchProps, ownProps) => {
    const { recipes } = stateProps;
    const { onUpadateRecipe } = dispatchProps;
    return Object.assign({}, stateProps, dispatchProps, ownProps, {
      onUpadateRecipe: onUpadateRecipe(recipes),
    });
  }
)(RecipeBox);
设计我们分享食谱页面,这边我们把编辑食谱和新增分享一起共用了同一个 components,差别在于我们会判断 UI State 中的 isEdit, 决定相应处理方式。在中 src/common/components/ShareBox/ShareBox.js,可以让使用者登录的后修改和删除食谱:
import React from 'react';
import { Form, FormGroup, Button, FormControl, ControlLabel } from 'react-bootstrap';

const ShareBox = (props) => {
  return (<div>
    <Form horizontal>
      <FormGroup
        controlId="formBasicText"
      >
        <ControlLabel>请输入食谱名称</ControlLabel>
        <FormControl
          type="text"
          placeholder="Enter text"
          defaultValue={props.name}
          onChange={props.onChangeNameInput}
        />
        <FormControl.Feedback />
      </FormGroup>
      <FormGroup
        controlId="formBasicText"
      >
        <ControlLabel>请输入食谱说明</ControlLabel>
        <FormControl
          componentClass="textarea"
          placeholder="textarea"
          defaultValue={props.description}
          onChange={props.onChangeDescriptionInput}
        />
        <FormControl.Feedback />
      </FormGroup>
      <FormGroup
        controlId="formBasicText"
      >
        <ControlLabel>请输入食谱图片网址</ControlLabel>
        <FormControl
          type="text"
          placeholder="Enter text"
          defaultValue={props.imagePath}
          onChange={props.onChangeImageUrl}
        />
        <FormControl.Feedback />
      </FormGroup>
      <Button
        onClick={props.onRecipeSubmit}
        bsStyle="success"
        bsSize="large"
        block
      >
        提交送出
      </Button>
    </Form>
  </div>);
};

export default ShareBox;
以下是 src/common/containers/ShareBoxContainer/ShareBoxContainer.js:
import React from 'react';
import { connect } from 'react-redux';
import ShareBox from '../../components/ShareBox';

import {
  addRecipe,
  updateRecipe,
  showSpinner,
  setRecipe,
} from '../../actions';

export default connect(
  (state) => ({
    recipes: state.getIn(['recipe', 'recipes']),
    recipeId: state.getIn(['recipe', 'recipe', 'id']),
    name: state.getIn(['recipe', 'recipe', 'name']),
    description: state.getIn(['recipe', 'recipe', 'description']),
    imagePath: state.getIn(['recipe', 'recipe', 'imagePath']),
    isEdit: state.getIn(['ui', 'isEdit']),
  }),
  (dispatch) => ({
    onChangeNameInput: (event) => (
      dispatch(setRecipe({ keyPath: ['recipe', 'name'], value: event.target.value }))
    ),
    onChangeDescriptionInput: (event) => (
      dispatch(setRecipe({ keyPath: ['recipe', 'description'], value: event.target.value }))
    ),
    onChangeImageUrl: (event) => (
      dispatch(setRecipe({ keyPath: ['recipe', 'imagePath'], value: event.target.value }))
    ),
    onRecipeSubmit: (recipes, recipeId, name, description, imagePath, isEdit) => () => {
      if (isEdit === true) {
        dispatch(updateRecipe(dispatch, recipeId, name, description, imagePath));
        dispatch(showSpinner());
      } else {
        dispatch(addRecipe(dispatch, name, description, imagePath));
        dispatch(showSpinner());
      }
    },
  }),
  (stateProps, dispatchProps, ownProps) => {
    const { recipes, recipeId, name, description, imagePath, isEdit } = stateProps;
    const { onRecipeSubmit } = dispatchProps;
    return Object.assign({}, stateProps, dispatchProps, ownProps, {
      onRecipeSubmit: onRecipeSubmit(recipes, recipeId, name, description, imagePath, isEdit),
    });
  }
)(ShareBox);
单纯的 SharePage(src/common/components/SharePage/SharePage.js)页面:
import React from 'react';
import { Grid, Row, Col } from 'react-bootstrap';
import ShareBoxContainer from '../../containers/ShareBoxContainer';

const SharePage = () => (
  <div>
    <Row className="show-grid">
      <Col xs={6} xsOffset={3}>
        <ShareBoxContainer />
      </Col>
    </Row>
  </div>
);

export default SharePage;
以下是 src/common/containers/SharePageContainer/SharePageContainer.js:
import React from 'react';
import { connect } from 'react-redux';
import SharePage from '../../components/SharePage';

export default connect(
  (state) => ({
  }),
  (dispatch) => ({
  })
)(SharePage);
恭喜你成功抵达终点!若一切顺利,在终端机打上 $ npm start,你将可以在浏览器的 http://localhost:3000 看到自己的成果!

总结
本章整合过去所学和添加一些后端资料库知识开发了一个可以登录会员并分享食谱的社群网站!快把你的成果和你的朋友分享吧!觉得意犹未尽?别忘了附录也很精采!最后,再次谢谢读者们支持我们一路走完了 React 开发学习之旅!然而前端技术变化很快,唯有不断自我学习才能持续成长。笔者才疏学浅,撰写学习心得或有疏漏,若有任何建议或提醒都欢迎和我说,大家一起加油:)
延伸阅读
- joshgeller/react-redux-jwt-auth-example
- Securing React Redux Apps With JWT Tokens
- Adding Authentication to Your React Native App Using JSON Web Tokens
- Authentication in React Applications, Part 2: JSON Web Token (JWT)
- Node.js 身份认证:Passport 入门
- react-bootstrap compatibility #83
- How to authenticate routes using Passport? #725
- Isomorphic React Web App Demo with Material UI
- react-router/examples/auth-flow/
- redux-promise
- How to use redux-promise
- Authenticate a Node.js API with JSON Web Tokens
- 3 JavaScript ORMs You Might Not Know
- lynndylanhurley/redux-auth
- How to avoid getting error 'localStorage is not defined' on server in ReactJS isomorphic app?
- Where to Store your JWTs – Cookies vs HTML5 Web Storage
- What is the difference between server side cookie and client side cookie? [closed]
- Cookies vs Tokens. Getting auth right with Angular.JS
- Cookies vs Tokens: The Definitive Guide
- joshgeller/react-redux-jwt-auth-example
- Programmatically navigate using react router
- withRouter HoC (higher-order component) v2.4.0 Upgrade Guide
License
MIT, Special thanks Loading.io
:door: 任意门
| 回首页 | 上一章:React Redux Sever Rendering(Isomorphic JavaScript)入门 | 下一章:附录一、React ES5、ES6+ 常见用法对照表 |
| 纠错、提问或许愿 |