Tensor and Variable
这是 PyTorch 基础的第二课,通过本次课程,你能够学会如何像使用 NumPy 一样使用 PyTorch,了解到 PyTorch 中的基本元素 Tensor 和 Variable 及其操作方式。
把 PyTorch 当做 NumPy 用
PyTorch 的官方介绍是一个拥有强力GPU加速的张量和动态构建网络的库,其主要构件是张量,所以我们可以把 PyTorch 当做 NumPy 来用,PyTorch 的很多操作好 NumPy 都是类似的,但是因为其能够在 GPU 上运行,所以有着比 NumPy 快很多倍的速度。
import torch
import numpy as np
# 创建一个 numpy ndarray
numpy_tensor = np.random.randn(10, 20)
我们可以使用下面两种方式将numpy的ndarray转换到tensor上
pytorch_tensor1 = torch.Tensor(numpy_tensor)
pytorch_tensor2 = torch.from_numpy(numpy_tensor)
使用以上两种方法进行转换的时候,会直接将 NumPy ndarray 的数据类型转换为对应的 PyTorch Tensor 数据类型
同时我们也可以使用下面的方法将 pytorch tensor 转换为 numpy ndarray
# 如果 pytorch tensor 在 cpu 上
numpy_array = pytorch_tensor1.numpy()

# 如果 pytorch tensor 在 gpu 上
numpy_array = pytorch_tensor1.cpu().numpy()
需要注意 GPU 上的 Tensor 不能直接转换为 NumPy ndarray,需要使用.cpu()先将 GPU 上的 Tensor 转到 CPU 上
PyTorch Tensor 使用 GPU 加速
我们可以使用以下两种方式将 Tensor 放到 GPU 上
# 第一种方式是定义 cuda 数据类型
dtype = torch.cuda.FloatTensor # 定义默认 GPU 的 数据类型
gpu_tensor = torch.randn(10, 20).type(dtype)

# 第二种方式更简单,推荐使用
gpu_tensor = torch.randn(10, 20).cuda(0) # 将 tensor 放到第一个 GPU 上
gpu_tensor = torch.randn(10, 20).cuda(1) # 将 tensor 放到第二个 GPU 上
使用第一种方式将 tensor 放到 GPU 上的时候会将数据类型转换成定义的类型,而是用第二种方式能够直接将 tensor 放到 GPU 上,类型跟之前保持一致
推荐在定义 tensor 的时候就明确数据类型,然后直接使用第二种方法将 tensor 放到 GPU 上
而将 tensor 放回 CPU 的操作非常简单
cpu_tensor = gpu_tensor.cpu()
我们也能够访问到 Tensor 的一些属性
# 可以通过下面两种方式得到 tensor 的大小
print(pytorch_tensor1.shape)
print(pytorch_tensor1.size())
torch.Size([10, 20])
torch.Size([10, 20])
# 得到 tensor 的数据类型
print(pytorch_tensor1.type())
torch.FloatTensor
# 得到 tensor 的维度
print(pytorch_tensor1.dim())
2
# 得到 tensor 的所有元素个数
print(pytorch_tensor1.numel())
200
小练习
查阅以下文档了解 tensor 的数据类型,创建一个 float64、大小是 3 x 2、随机初始化的 tensor,将其转化为 numpy 的 ndarray,输出其数据类型
参考输出: float64
# 答案
x = torch.randn(3, 2)
x = x.type(torch.DoubleTensor)
x_array = x.numpy()
print(x_array.dtype)
float64
Tensor的操作
Tensor 操作中的 api 和 NumPy 非常相似,如果你熟悉 NumPy 中的操作,那么 tensor 基本是一致的,下面我们来列举其中的一些操作
x = torch.ones(2, 2)
print(x) # 这是一个float tensor
 1  1
 1  1
[torch.FloatTensor of size 2x2]
print(x.type())
torch.FloatTensor
# 将其转化为整形
x = x.long()
# x = x.type(torch.LongTensor)
print(x)
 1  1
 1  1
[torch.LongTensor of size 2x2]
# 再将其转回 float
x = x.float()
# x = x.type(torch.FloatTensor)
print(x)
 1  1
 1  1
[torch.FloatTensor of size 2x2]
x = torch.randn(4, 3)
print(x)
-0.8203 -0.0328  1.8283
-0.1734 -0.1873  0.9818
-1.8368 -2.2450 -0.4410
-0.8005 -2.1132  0.7140
[torch.FloatTensor of size 4x3]
# 沿着行取最大值
max_value, max_idx = torch.max(x, dim=1)
# 每一行的最大值
max_value
 1.8283
 0.9818
-0.4410
 0.7140
[torch.FloatTensor of size 4]
# 每一行最大值的下标
max_idx
 2
 2
 2
 2
[torch.LongTensor of size 4]
# 沿着行对 x 求和
sum_x = torch.sum(x, dim=1)
print(sum_x)
 0.9751
 0.6212
-4.5228
-2.1997
[torch.FloatTensor of size 4]
# 增加维度或者减少维度
print(x.shape)
x = x.unsqueeze(0) # 在第一维增加
print(x.shape)
torch.Size([4, 3])
torch.Size([1, 4, 3])
x = x.unsqueeze(1) # 在第二维增加
print(x.shape)
torch.Size([1, 1, 4, 3])
x = x.squeeze(0) # 减少第一维
print(x.shape)
torch.Size([1, 4, 3])
x = x.squeeze() # 将 tensor 中所有的一维全部都去掉
print(x.shape)
torch.Size([4, 3])
x = torch.randn(3, 4, 5)
print(x.shape)

# 使用permute和transpose进行维度交换
x = x.permute(1, 0, 2) # permute 可以重新排列 tensor 的维度
print(x.shape)

x = x.transpose(0, 2)  # transpose 交换 tensor 中的两个维度
print(x.shape)
torch.Size([3, 4, 5])
torch.Size([4, 3, 5])
torch.Size([5, 3, 4])
# 使用 view 对 tensor 进行 reshape
x = torch.randn(3, 4, 5)
print(x.shape)

x = x.view(-1, 5) # -1 表示任意的大小,5 表示第二维变成 5
print(x.shape)

x = x.view(3, 20) # 重新 reshape 成 (3, 20) 的大小
print(x.shape)
torch.Size([3, 4, 5])
torch.Size([12, 5])
torch.Size([3, 20])
x = torch.randn(3, 4)
y = torch.randn(3, 4)

# 两个 tensor 求和
z = x + y
# z = torch.add(x, y)
另外,pytorch中大多数的操作都支持 inplace 操作,也就是可以直接对 tensor 进行操作而不需要另外开辟内存空间,方式非常简单,一般都是在操作的符号后面加_,比如
x = torch.ones(3, 3)
print(x.shape)

# unsqueeze 进行 inplace
x.unsqueeze_(0)
print(x.shape)

# transpose 进行 inplace
x.transpose_(1, 0)
print(x.shape)
torch.Size([3, 3])
torch.Size([1, 3, 3])
torch.Size([3, 1, 3])
x = torch.ones(3, 3)
y = torch.ones(3, 3)
print(x)

# add 进行 inplace
x.add_(y)
print(x)
小练习
访问文档了解 tensor 更多的 api,实现下面的要求
创建一个 float32、4 x 4 的全为1的矩阵,将矩阵正中间 2 x 2 的矩阵,全部修改成2
参考输出
$$ \left[ \begin{matrix} 1 & 1 & 1 & 1 \ 1 & 2 & 2 & 1 \ 1 & 2 & 2 & 1 \ 1 & 1 & 1 & 1 \end{matrix} \right] \ [torch.FloatTensor\ of\ size\ 4x4]
$$
# 答案
x = torch.ones(4, 4).float()
x[1:3, 1:3] = 2
print(x)
 1  1  1  1
 1  2  2  1
 1  2  2  1
 1  1  1  1
[torch.FloatTensor of size 4x4]
Variable
tensor 是 PyTorch 中的完美组件,但是构建神经网络还远远不够,我们需要能够构建计算图的 tensor,这就是 Variable。Variable 是对 tensor 的封装,操作和 tensor 是一样的,但是每个 Variabel都有三个属性,Variable 中的 tensor本身.data,对应 tensor 的梯度.grad以及这个 Variable 是通过什么方式得到的.grad_fn
# 通过下面这种方式导入 Variable
from torch.autograd import Variable
x_tensor = torch.randn(10, 5)
y_tensor = torch.randn(10, 5)

# 将 tensor 变成 Variable
x = Variable(x_tensor, requires_grad=True) # 默认 Variable 是不需要求梯度的,所以我们用这个方式申明需要对其进行求梯度
y = Variable(y_tensor, requires_grad=True)
z = torch.sum(x + y)
print(z.data)
print(z.grad_fn)
-2.1379
[torch.FloatTensor of size 1]

<SumBackward0 object at 0x10da636a0>
上面我们打出了 z 中的 tensor 数值,同时通过grad_fn知道了其是通过 Sum 这种方式得到的
# 求 x 和 y 的梯度
z.backward()

print(x.grad)
print(y.grad)
Variable containing:
    1     1     1     1     1
    1     1     1     1     1
    1     1     1     1     1
    1     1     1     1     1
    1     1     1     1     1
    1     1     1     1     1
    1     1     1     1     1
    1     1     1     1     1
    1     1     1     1     1
    1     1     1     1     1
[torch.FloatTensor of size 10x5]
通过.grad我们得到了 x 和 y 的梯度,这里我们使用了 PyTorch 提供的自动求导机制,非常方便,下一小节会具体讲自动求导。
小练习
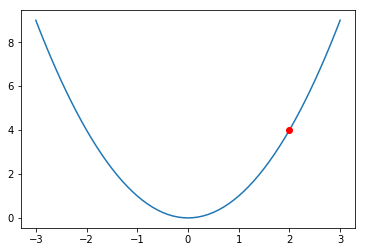
尝试构建一个函数 $y = x^2 $,然后求 x=2 的导数。
参考输出:4
提示:
$y = x^2$的图像如下
import matplotlib.pyplot as plt
x = np.arange(-3, 3.01, 0.1)
y = x ** 2
plt.plot(x, y)
plt.plot(2, 4, 'ro')
plt.show()
# 答案
x = Variable(torch.FloatTensor([2]), requires_grad=True)
y = x ** 2
y.backward()
print(x.grad)
Variable containing:
 4
[torch.FloatTensor of size 1]
下一次课程我们将会从导数展开,了解 PyTorch 的自动求导机制