GoogLeNet
前面我们讲的 VGG 是 2014 年 ImageNet 比赛的亚军,那么冠军是谁呢?就是我们马上要讲的 GoogLeNet,这是 Google 的研究人员提出的网络结构,在当时取得了非常大的影响,因为网络的结构变得前所未有,它颠覆了大家对卷积网络的串联的印象和固定做法,采用了一种非常有效的 inception 模块,得到了比 VGG 更深的网络结构,但是却比 VGG 的参数更少,因为其去掉了后面的全连接层,所以参数大大减少,同时有了很高的计算效率。
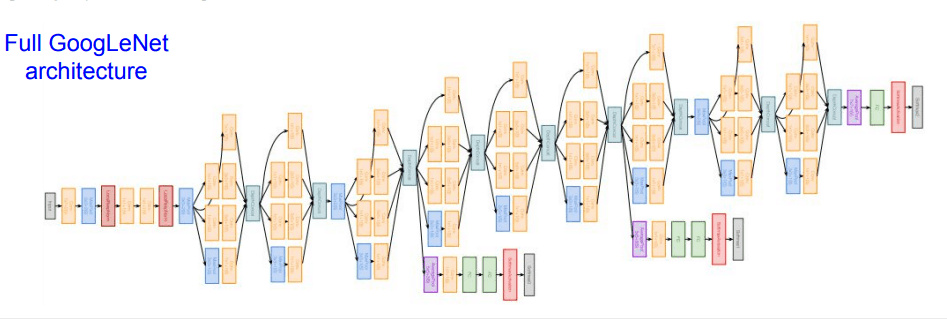
这是 googlenet 的网络示意图,下面我们介绍一下其作为创新的 inception 模块。
Inception 模块
在上面的网络中,我们看到了多个四个并行卷积的层,这些四个卷积并行的层就是 inception 模块,可视化如下
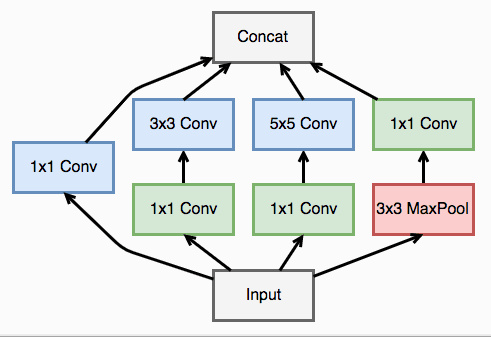
一个 inception 模块的四个并行线路如下: 1.一个 1 x 1 的卷积,一个小的感受野进行卷积提取特征 2.一个 1 x 1 的卷积加上一个 3 x 3 的卷积,1 x 1 的卷积降低输入的特征通道,减少参数计算量,然后接一个 3 x 3 的卷积做一个较大感受野的卷积 3.一个 1 x 1 的卷积加上一个 5 x 5 的卷积,作用和第二个一样 4.一个 3 x 3 的最大池化加上 1 x 1 的卷积,最大池化改变输入的特征排列,1 x 1 的卷积进行特征提取
最后将四个并行线路得到的特征在通道这个维度上拼接在一起,下面我们可以实现一下
import sys
sys.path.append('..')

import numpy as np
import torch
from torch import nn
from torch.autograd import Variable
from torchvision.datasets import CIFAR10
# 定义一个卷积加一个 relu 激活函数和一个 batchnorm 作为一个基本的层结构
def conv_relu(in_channel, out_channel, kernel, stride=1, padding=0):
    layer = nn.Sequential(
        nn.Conv2d(in_channel, out_channel, kernel, stride, padding),
        nn.BatchNorm2d(out_channel, eps=1e-3),
        nn.ReLU(True)
    )
    return layer
class inception(nn.Module):
    def __init__(self, in_channel, out1_1, out2_1, out2_3, out3_1, out3_5, out4_1):
        super(inception, self).__init__()
        # 第一条线路
        self.branch1x1 = conv_relu(in_channel, out1_1, 1)

        # 第二条线路
        self.branch3x3 = nn.Sequential(
            conv_relu(in_channel, out2_1, 1),
            conv_relu(out2_1, out2_3, 3, padding=1)
        )

        # 第三条线路
        self.branch5x5 = nn.Sequential(
            conv_relu(in_channel, out3_1, 1),
            conv_relu(out3_1, out3_5, 5, padding=2)
        )

        # 第四条线路
        self.branch_pool = nn.Sequential(
            nn.MaxPool2d(3, stride=1, padding=1),
            conv_relu(in_channel, out4_1, 1)
        )

    def forward(self, x):
        f1 = self.branch1x1(x)
        f2 = self.branch3x3(x)
        f3 = self.branch5x5(x)
        f4 = self.branch_pool(x)
        output = torch.cat((f1, f2, f3, f4), dim=1)
        return output
test_net = inception(3, 64, 48, 64, 64, 96, 32)
test_x = Variable(torch.zeros(1, 3, 96, 96))
print('input shape: {} x {} x {}'.format(test_x.shape[1], test_x.shape[2], test_x.shape[3]))
test_y = test_net(test_x)
print('output shape: {} x {} x {}'.format(test_y.shape[1], test_y.shape[2], test_y.shape[3]))
input shape: 3 x 96 x 96
output shape: 256 x 96 x 96
可以看到输入经过了 inception 模块之后,大小没有变化,通道的维度变多了
下面我们定义 GoogLeNet,GoogLeNet 可以看作是很多个 inception 模块的串联,注意,原论文中使用了多个输出来解决梯度消失的问题,这里我们只定义一个简单版本的 GoogLeNet,简化为一个输出
class googlenet(nn.Module):
    def __init__(self, in_channel, num_classes, verbose=False):
        super(googlenet, self).__init__()
        self.verbose = verbose

        self.block1 = nn.Sequential(
            conv_relu(in_channel, out_channel=64, kernel=7, stride=2, padding=3),
            nn.MaxPool2d(3, 2)
        )

        self.block2 = nn.Sequential(
            conv_relu(64, 64, kernel=1),
            conv_relu(64, 192, kernel=3, padding=1),
            nn.MaxPool2d(3, 2)
        )

        self.block3 = nn.Sequential(
            inception(192, 64, 96, 128, 16, 32, 32),
            inception(256, 128, 128, 192, 32, 96, 64),
            nn.MaxPool2d(3, 2)
        )

        self.block4 = nn.Sequential(
            inception(480, 192, 96, 208, 16, 48, 64),
            inception(512, 160, 112, 224, 24, 64, 64),
            inception(512, 128, 128, 256, 24, 64, 64),
            inception(512, 112, 144, 288, 32, 64, 64),
            inception(528, 256, 160, 320, 32, 128, 128),
            nn.MaxPool2d(3, 2)
        )

        self.block5 = nn.Sequential(
            inception(832, 256, 160, 320, 32, 128, 128),
            inception(832, 384, 182, 384, 48, 128, 128),
            nn.AvgPool2d(2)
        )

        self.classifier = nn.Linear(1024, num_classes)

    def forward(self, x):
        x = self.block1(x)
        if self.verbose:
            print('block 1 output: {}'.format(x.shape))
        x = self.block2(x)
        if self.verbose:
            print('block 2 output: {}'.format(x.shape))
        x = self.block3(x)
        if self.verbose:
            print('block 3 output: {}'.format(x.shape))
        x = self.block4(x)
        if self.verbose:
            print('block 4 output: {}'.format(x.shape))
        x = self.block5(x)
        if self.verbose:
            print('block 5 output: {}'.format(x.shape))
        x = x.view(x.shape[0], -1)
        x = self.classifier(x)
        return x
test_net = googlenet(3, 10, True)
test_x = Variable(torch.zeros(1, 3, 96, 96))
test_y = test_net(test_x)
print('output: {}'.format(test_y.shape))
block 1 output: torch.Size([1, 64, 23, 23])
block 2 output: torch.Size([1, 192, 11, 11])
block 3 output: torch.Size([1, 480, 5, 5])
block 4 output: torch.Size([1, 832, 2, 2])
block 5 output: torch.Size([1, 1024, 1, 1])
output: torch.Size([1, 10])
可以看到输入的尺寸不断减小,通道的维度不断增加
from utils import train

def data_tf(x):
    x = x.resize((96, 96), 2) # 将图片放大到 96 x 96
    x = np.array(x, dtype='float32') / 255
    x = (x - 0.5) / 0.5 # 标准化,这个技巧之后会讲到
    x = x.transpose((2, 0, 1)) # 将 channel 放到第一维,只是 pytorch 要求的输入方式
    x = torch.from_numpy(x)
    return x

train_set = CIFAR10('./data', train=True, transform=data_tf)
train_data = torch.utils.data.DataLoader(train_set, batch_size=64, shuffle=True)
test_set = CIFAR10('./data', train=False, transform=data_tf)
test_data = torch.utils.data.DataLoader(test_set, batch_size=128, shuffle=False)

net = googlenet(3, 10)
optimizer = torch.optim.SGD(net.parameters(), lr=0.01)
criterion = nn.CrossEntropyLoss()
train(net, train_data, test_data, 20, optimizer, criterion)
Epoch 0. Train Loss: 1.504840, Train Acc: 0.452605, Valid Loss: 1.372426, Valid Acc: 0.514339, Time 00:01:25
Epoch 1. Train Loss: 1.046663, Train Acc: 0.630734, Valid Loss: 1.147823, Valid Acc: 0.606309, Time 00:01:02
Epoch 2. Train Loss: 0.833869, Train Acc: 0.710618, Valid Loss: 1.017181, Valid Acc: 0.644284, Time 00:00:54
Epoch 3. Train Loss: 0.688739, Train Acc: 0.760670, Valid Loss: 0.847099, Valid Acc: 0.712520, Time 00:00:58
Epoch 4. Train Loss: 0.576516, Train Acc: 0.801111, Valid Loss: 0.850494, Valid Acc: 0.706487, Time 00:01:01
Epoch 5. Train Loss: 0.483854, Train Acc: 0.832241, Valid Loss: 0.802392, Valid Acc: 0.726958, Time 00:01:08
Epoch 6. Train Loss: 0.410416, Train Acc: 0.857657, Valid Loss: 0.865246, Valid Acc: 0.721618, Time 00:01:23
Epoch 7. Train Loss: 0.346010, Train Acc: 0.881813, Valid Loss: 0.850472, Valid Acc: 0.729430, Time 00:01:28
Epoch 8. Train Loss: 0.289854, Train Acc: 0.900815, Valid Loss: 1.313582, Valid Acc: 0.650712, Time 00:01:22
Epoch 9. Train Loss: 0.239552, Train Acc: 0.918378, Valid Loss: 0.970173, Valid Acc: 0.726661, Time 00:01:30
Epoch 10. Train Loss: 0.212439, Train Acc: 0.927270, Valid Loss: 1.188284, Valid Acc: 0.665843, Time 00:01:29
Epoch 11. Train Loss: 0.175206, Train Acc: 0.939758, Valid Loss: 0.736437, Valid Acc: 0.790051, Time 00:01:29
Epoch 12. Train Loss: 0.140491, Train Acc: 0.952366, Valid Loss: 0.878171, Valid Acc: 0.764241, Time 00:01:14
Epoch 13. Train Loss: 0.127249, Train Acc: 0.956981, Valid Loss: 1.159881, Valid Acc: 0.731309, Time 00:01:00
Epoch 14. Train Loss: 0.108748, Train Acc: 0.962836, Valid Loss: 1.234320, Valid Acc: 0.716377, Time 00:01:23
Epoch 15. Train Loss: 0.091655, Train Acc: 0.969030, Valid Loss: 0.822575, Valid Acc: 0.790348, Time 00:01:28
Epoch 16. Train Loss: 0.086218, Train Acc: 0.970309, Valid Loss: 0.943607, Valid Acc: 0.767306, Time 00:01:24
Epoch 17. Train Loss: 0.069979, Train Acc: 0.976822, Valid Loss: 1.038973, Valid Acc: 0.755340, Time 00:01:22
Epoch 18. Train Loss: 0.066750, Train Acc: 0.977322, Valid Loss: 0.838827, Valid Acc: 0.801226, Time 00:01:23
Epoch 19. Train Loss: 0.052757, Train Acc: 0.982577, Valid Loss: 0.876127, Valid Acc: 0.796479, Time 00:01:25
GoogLeNet 加入了更加结构化的 Inception 块使得我们能够使用更大的通道,更多的层,同时也控制了计算量。
小练习:GoogLeNet 有很多后续的版本,尝试看看论文,看看有什么不同,实现一下:
v1:最早的版本
v2:加入 batch normalization 加快训练
v3:对 inception 模块做了调整
v4:基于 ResNet 加入了 残差连接