4.2.2 Service进阶
本节引言
上节我们学习了Service的生命周期,以及两种启动Service的两种方法, 本节继续来深入了解Service中的IntentService,Service的使用实例: 前台服务与轮询的实现!
1.IntentService的使用
在上一节后我们已经知道了如何去定义和启动Service,但是如果我们直接把 耗时线程放到Service中的onStart()方法中,虽然可以这样做,但是很容易 会引起ANR异常(Application Not Responding),而Android的官方在介绍 Service有下面这样一段话:

直接翻译:
1.Service不是一个单独的进程,它和它的应用程序在同一个进程中 2.Service不是一个线程,这样就意味着我们应该避免在Service中进行耗时操作
于是乎,Android给我们提供了解决上述问题的替代品,就是下面要讲的IntentService; IntentService是继承与Service并处理异步请求的一个类,在IntentService中有 一个工作线程来处理耗时操作,请求的Intent记录会加入队列
工作流程:
客户端通过startService(Intent)来启动IntentService; 我们并不需要手动地区控制IntentService,当任务执行完后,IntentService会自动停止; 可以启动IntentService多次,每个耗时操作会以工作队列的方式在IntentService的 onHandleIntent回调方法中执行,并且每次只会执行一个工作线程,执行完一,再到二这样!
再接着是代码演示,网上大部分的代码都是比较Service与IntentService的, 定义足够长的休眠时间,演示Service的ANR异常,然后引出IntentService有多好! 这里就不演示Service了,网上的都是自定义Service,然后在onStart()方法 中Thread.sleep(20000)然后引发ANR异常,有兴趣的可以自己写代码试试, 这里的话只演示下IntentService的用法!
TestService3.java
public class TestService3 extends IntentService {
    private final String TAG = "hehe";
    //必须实现父类的构造方法
    public TestService3()
    {
        super("TestService3");
    }

    //必须重写的核心方法
    @Override
    protected void onHandleIntent(Intent intent) {
        //Intent是从Activity发过来的,携带识别参数,根据参数不同执行不同的任务
        String action = intent.getExtras().getString("param");
        if(action.equals("s1"))Log.i(TAG,"启动service1");
        else if(action.equals("s2"))Log.i(TAG,"启动service2");
        else if(action.equals("s3"))Log.i(TAG,"启动service3");

        //让服务休眠2秒
        try{
            Thread.sleep(2000);
        }catch(InterruptedException e){e.printStackTrace();}
    }

    //重写其他方法,用于查看方法的调用顺序
    @Override
    public IBinder onBind(Intent intent) {
        Log.i(TAG,"onBind");
        return super.onBind(intent);
    }

    @Override
    public void onCreate() {
        Log.i(TAG,"onCreate");
        super.onCreate();
    }

    @Override
    public int onStartCommand(Intent intent, int flags, int startId) {
        Log.i(TAG,"onStartCommand");
        return super.onStartCommand(intent, flags, startId);
    }

    @Override
    public void setIntentRedelivery(boolean enabled) {
        super.setIntentRedelivery(enabled);
        Log.i(TAG,"setIntentRedelivery");
    }

    @Override
    public void onDestroy() {
        Log.i(TAG,"onDestroy");
        super.onDestroy();
    }

}
AndroidManifest.xml注册下Service
<service android:name=".TestService3" android:exported="false">
    <intent-filter >
        <action android:name="com.test.intentservice"/>
    </intent-filter>
</service>
在MainActivity启动三次服务:
public class MainActivity extends Activity {

    @Override
    protected void onCreate(Bundle savedInstanceState) {
        super.onCreate(savedInstanceState);
        setContentView(R.layout.activity_main);

        Intent it1 = new Intent("com.test.intentservice");
        Bundle b1 = new Bundle();
        b1.putString("param", "s1");
        it1.putExtras(b1);

        Intent it2 = new Intent("com.test.intentservice");
        Bundle b2 = new Bundle();
        b2.putString("param", "s2");
        it2.putExtras(b2);

        Intent it3 = new Intent("com.test.intentservice");
        Bundle b3 = new Bundle();
        b3.putString("param", "s3");
        it3.putExtras(b3);

        //接着启动多次IntentService,每次启动,都会新建一个工作线程
        //但始终只有一个IntentService实例
        startService(it1);
        startService(it2);
        startService(it3);
    }
}
运行截图:
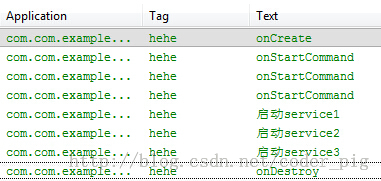
小结:
当一个后台的任务,需要分成几个子任务,然后按先后顺序执行,子任务 (简单的说就是异步操作),此时如果我们还是定义一个普通Service然后 在onStart方法中开辟线程,然后又要去控制线程,这样显得非常的繁琐; 此时应该自定义一个IntentService然后再onHandleIntent()方法中完成相关任务!
2.Activity与Service通信
我们前面的操作都是通过Activity启动和停止Service,假如我们启动的是一个下载 的后台Service,而我们想知道Service中下载任务的进度!那么这肯定是需要Service 与Activity进行通信的,而他们之间交流的媒介就是Service中的onBind()方法! 返回一个我们自定义的Binder对象!
基本流程如下:
- 1.自定义Service中,自定义一个Binder类,然后将需要暴露的方法都写到该类中!
- 2.Service类中,实例化这个自定义Binder类,然后重写onBind()方法,将这个Binder对象返回!
- 3.Activity类中实例化一个ServiceConnection对象,重写onServiceConnected()方法,然后 获取Binder对象,然后调用相关方法即可!
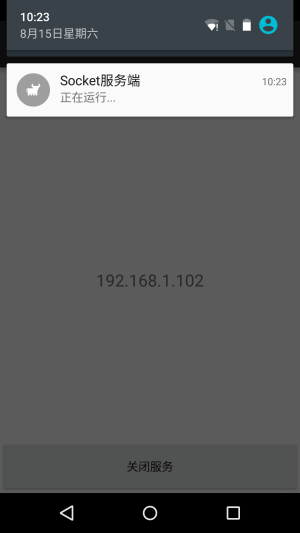
3.一个简单前台服务的实现
学到现在,我们都知道Service一般都是运行在后来的,但是Service的系统优先级 还是比较低的,当系统内存不足的时候,就有可能回收正在后台运行的Service, 对于这种情况我们可以使用前台服务,从而让Service稍微没那么容易被系统杀死, 当然还是有可能被杀死的...所谓的前台服务就是状态栏显示的Notification!
实现起来也很简单,最近做的项目刚好用到这个前台服务,就把核心的代码抠出来 分享下:
在自定义的Service类中,重写onCreate(),然后根据自己的需求定制Notification; 定制完毕后,调用startForeground(1,notification对象)即可! 核心代码如下:
public void onCreate()
{
    super.onCreate();
    Notification.Builder localBuilder = new Notification.Builder(this);
    localBuilder.setContentIntent(PendingIntent.getActivity(this, 0, new Intent(this, MainActivity.class), 0));
    localBuilder.setAutoCancel(false);
    localBuilder.setSmallIcon(R.mipmap.ic_cow_icon);
    localBuilder.setTicker("Foreground Service Start");
    localBuilder.setContentTitle("Socket服务端");
    localBuilder.setContentText("正在运行...");
    startForeground(1, localBuilder.getNotification());
}
运行效果截图:
4.简单定时后台线程的实现
除了上述的前台服务外,实际开发中Service还有一种常见的用法,就是执行定时任务, 比如轮询,就是每间隔一段时间就请求一次服务器,确认客户端状态或者进行信息更新 等!而Android中给我们提供的定时方式有两种使用Timer类与Alarm机制!
前者不适合于需要长期在后台运行的定时任务,CPU一旦休眠,Timer中的定时任务 就无法运行;Alarm则不存在这种情况,他具有唤醒CPU的功能,另外,也要区分CPU 唤醒与屏幕唤醒!
使用流程:
- Step 1:获得Service: AlarmManager manager = (AlarmManager) getSystemService(ALARM_SERVICE);
- Step 2:通过set方法设置定时任务 int anHour = 2 * 1000; long triggerAtTime = SystemClock.elapsedRealtime() + anHour; manager.set(AlarmManager.RTC_WAKEUP,triggerAtTime,pendingIntent);
- Step 3:定义一个Service 在onStartCommand中开辟一条事务线程,用于处理一些定时逻辑
- Step 4:定义一个Broadcast(广播),用于启动Service 最后别忘了,在AndroidManifest.xml中对这Service与Boradcast进行注册!
参数详解: set(int type,long startTime,PendingIntent pi)
①type: 有五个可选值: AlarmManager.ELAPSED_REALTIME: 闹钟在手机睡眠状态下不可用,该状态下闹钟使用相对时间(相对于系统启动开始),状态值为3; AlarmManager.ELAPSED_REALTIME_WAKEUP 闹钟在睡眠状态下会唤醒系统并执行提示功能,该状态下闹钟也使用相对时间,状态值为2; AlarmManager.RTC 闹钟在睡眠状态下不可用,该状态下闹钟使用绝对时间,即当前系统时间,状态值为1; AlarmManager.RTC_WAKEUP 表示闹钟在睡眠状态下会唤醒系统并执行提示功能,该状态下闹钟使用绝对时间,状态值为0; AlarmManager.POWER_OFF_WAKEUP 表示闹钟在手机关机状态下也能正常进行提示功能,所以是5个状态中用的最多的状态之一, 该状态下闹钟也是用绝对时间,状态值为4;不过本状态好像受SDK版本影响,某些版本并不支持;
PS:第一个参数决定第二个参数的类型,如果是REALTIME的话就用: SystemClock.elapsedRealtime( )方法可以获得系统开机到现在经历的毫秒数 如果是RTC的就用:System.currentTimeMillis()可获得从1970.1.1 0点到 现在做经历的毫秒数
②startTime: 闹钟的第一次执行时间,以毫秒为单位,可以自定义时间,不过一般使用当前时间。 需要注意的是,本属性与第一个属性(type)密切相关,如果第一个参数对应的闹钟 使用的是相对时间(ELAPSED_REALTIME和ELAPSED_REALTIME_WAKEUP),那么本属 性就得使用相对时间(相对于系统启动时间来说),比如当前时间就表示为: SystemClock.elapsedRealtime();如果第一个参数对应的闹钟使用的是绝对时间 (RTC、RTC_WAKEUP、POWER_OFF_WAKEUP),那么本属性就得使用绝对时间, 比如当前时间就表示为:System.currentTimeMillis()。
③PendingIntent: 绑定了闹钟的执行动作,比如发送一个广播、给出提示等等。PendingIntent 是Intent的封装类。 需要注意的是,如果是通过启动服务来实现闹钟提示的话, PendingIntent对象的获取就应该采用Pending.getService (Context c,int i,Intent intent,int j)方法; 如果是通过广播来实现闹钟提示的话, PendingIntent对象的获取就应该采用 PendingIntent.getBroadcast (Context c,int i,Intent intent,int j)方法; 如果是采用Activity的方式来实现闹钟提示的话,PendingIntent对象的获取 就应该采用 PendingIntent.getActivity(Context c,int i,Intent intent,int j) 方法。 如果这三种方法错用了的话,虽然不会报错,但是看不到闹钟提示效果。
另外:
从4.4版本后(API 19),Alarm任务的触发时间可能变得不准确,有可能会延时,是系统 对于耗电性的优化,如果需要准确无误可以调用setExtra()方法~
核心代码:
public class LongRunningService extends Service {
    @Override
    public IBinder onBind(Intent intent) {
        return null;
    }

    @Override
    public int onStartCommand(Intent intent, int flags, int startId) {
        //这里开辟一条线程,用来执行具体的逻辑操作:
        new Thread(new Runnable() {
            @Override
            public void run() {
                Log.d("BackService", new Date().toString());
            }
        }).start();
        AlarmManager manager = (AlarmManager) getSystemService(ALARM_SERVICE);
        //这里是定时的,这里设置的是每隔两秒打印一次时间=-=,自己改
        int anHour = 2 * 1000;
        long triggerAtTime = SystemClock.elapsedRealtime() + anHour;
        Intent i = new Intent(this,AlarmReceiver.class);
        PendingIntent pi = PendingIntent.getBroadcast(this, 0, i, 0);
        manager.set(AlarmManager.ELAPSED_REALTIME_WAKEUP, triggerAtTime, pi);
        return super.onStartCommand(intent, flags, startId);
    }
}
AlarmReceiver.java
public class AlarmReceiver extends BroadcastReceiver {

    @Override
    public void onReceive(Context context, Intent intent) {
        Intent i = new Intent(context,LongRunningService.class);
        context.startService(i);
    }
}
本节小结:
本节我们继续对Service进行更深入的学习,IntentService以及Service 在实际开发中的两个常用的案例:前台Service的实现,以及Service后台 Service的实现!下一节中我们会继续研究Service的AIDL,跨进程通信, 敬请期待~
参考文献: 《第一行代码 Android》—— 郭霖:很好的一本Android入门书!