4.4.2 ContentProvider再探——Document Provider
本节引言:
学完上一节,相信你已经知道如何去使用系统提供的ContentProvider或者自定义ContentProvider了, 已经基本满足日常开发的需求了,有趣的是,我在官方文档上看到了另外这几个Provider:
Calendar Provider:日历提供者,就是针对针对日历相关事件的一个资源库,通过他提供的API,我们 可以对日历,时间,会议,提醒等内容做一些增删改查! Contacts Provider:联系人提供者,这个就不用说了,这个用得最多~后面有时间再回头翻译下这篇文章吧! Storage Access Framework(SAF):存储访问框架,4.4以后引入的一个新玩意,为用户浏览手机中的 存储内容提供了便利,可供访问的内容不仅包括:文档,图片,视频,音频,下载,而且包含所有由 由特定ContentProvider(须具有约定的API)提供的内容。不管这些内容来自于哪里,不管是哪个应 用调用浏览系统文件内容的命令,系统都会用一个统一的界面让你去浏览。 其实就是一个内置的应用程序,叫做DocumentsUI,因为它的IntentFilter不带有LAUNCHER,所以我们并没有 在桌面上找到这个东东!嘿嘿,试下下面的代码,这里我们选了两个手机来对比: 分别是4.2的Lenovo S898T 和 5.0.1的Nexus 5做对比,执行下述代码:
Intent intent = new Intent(Intent.ACTION_OPEN_DOCUMENT); intent.addCategory(Intent.CATEGORY_OPENABLE); intent.setType("image/*"); startActivity(intent);
下面是运行结果:
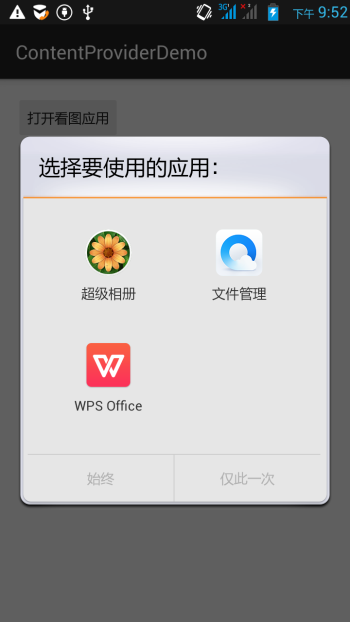

右面这个就是4.4给我们带来的新玩意了,一般我们获取文件Url的时候就可以用到它~ 接下来简单的走下文档吧~
2.简单走下文档:
1)SAF框架的组成:
- Document provider:一个特殊的ContentProvider,让一个存储服务(比如Google Drive)可以 对外展示自己所管理的文件。它是DocumentsProvider的子类,另外,document-provider的存储格式 和传统的文件存储格式一致,至于你的内容如何存储,则完全决定于你自己,Android系统已经内置了几个 这样的Document provider,比如关于下载,图片以及视频的Document provider!
- Client app:一个普通的客户端软件,通过触发ACTION_OPEN_DOCUMENT 和/或 ACTION_CREATE_DOCUMENT就可以接收到来自于Document provider返回的内容,比如选择一个图片, 然后返回一个Uri。
- Picker:类似于文件管理器的界面,而且是系统级的界面,提供额访问客户端过滤条件的 Document provider内容的通道,就是起说的那个DocumentsUI程序!
一些特性:
- 用户可以浏览所有document provider提供的内容,而不仅仅是单一的应用程序
- 提供了长期、持续的访问document provider中文件的能力以及数据的持久化, 用户可以实现添加、删除、编辑、保存document provider所维护的内容
- 支持多用户以及临时性的内容服务,比如USB storage providers只有当驱动安装成功才会出现
2)概述:
SAF的核心是实现了DocumentsProvider的子类,还是一个ContentProvider。在一个document provider 中是以传统的文件目录树组织起来的:

3)流程图:
如上面所述,document provider data是基于传统的文件层次结构的,不过那只是对外的表现形式, 如何存储你的数据,取决于你自己,只要你对海外的接口能够通过DocumentsProvider的api访问就可以。 下面的流程图展示了一个photo应用使用SAF可能的结构:
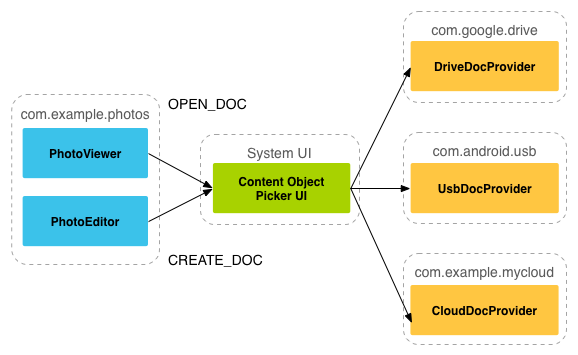
分析:
从上图,我们可以看出Picker是链接调用者和内容提供者的一个桥梁!他提供并告诉调用者,可以选择 哪些内容提供者,比如这里的DriveDocProvider,UsbDocProvider,CloundDocProvider。 当客户端触发了ACTION_OPEN_DOCUMENT或ACTION_CREATE_DOCUMENT的Intent,就会发生上述交互。 当然我们还可以在Intent中增加过滤条件,比如限制MIME type的类型为"image"!
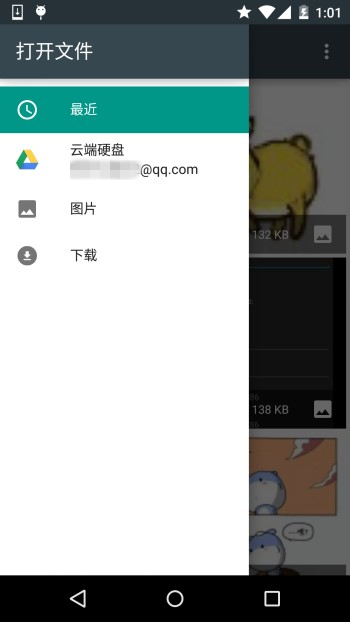
就是上面这些东西,如果你还安装了其他看图的软件的话,也会在这里看到! 简单点说就是:客户端发送了上面两种Action的Intent后,会打开Picker UI,在这里会显示相关可用的 Document Provider,供用户选择,用户选择后可以获得文件的相关信息!
4)客户端调用,并获取返回的Uri
实现代码如下:
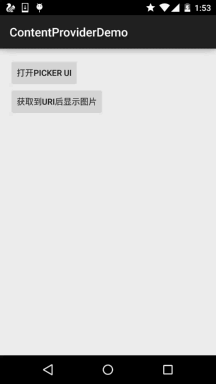
public class MainActivity extends AppCompatActivity implements View.OnClickListener { private static final int READ_REQUEST_CODE = 42; @Override protected void onCreate(Bundle savedInstanceState) { super.onCreate(savedInstanceState); setContentView(R.layout.activity_main); Button btn_show = (Button) findViewById(R.id.btn_show); btn_show.setOnClickListener(this); } @Override public void onClick(View v) { Intent intent = new Intent(Intent.ACTION_OPEN_DOCUMENT); intent.addCategory(Intent.CATEGORY_OPENABLE); intent.setType("image/*"); startActivityForResult(intent, READ_REQUEST_CODE); } @Override protected void onActivityResult(int requestCode, int resultCode, Intent data) { if (requestCode == READ_REQUEST_CODE && resultCode == Activity.RESULT_OK) { Uri uri; if (data != null) { uri = data.getData(); Log.e("HeHe", "Uri: " + uri.toString()); } } } }
运行结果: 比如我们选中那只狗,然后Picker UI自己会关掉,然后Logcat上可以看到这样一个uri:

5)根据uri获取文件参数
核心代码如下:
public void dumpImageMetaData(Uri uri) { Cursor cursor = getContentResolver() .query(uri, null, null, null, null, null); try { if (cursor != null && cursor.moveToFirst()) { String displayName = cursor.getString( cursor.getColumnIndex(OpenableColumns.DISPLAY_NAME)); Log.e("HeHe", "Display Name: " + displayName); int sizeIndex = cursor.getColumnIndex(OpenableColumns.SIZE); String size = null; if (!cursor.isNull(sizeIndex)) { size = cursor.getString(sizeIndex); }else { size = "Unknown"; } Log.e("HeHe", "Size: " + size); } }finally { cursor.close(); } }
运行结果: 还是那只狗,调用方法后会输入文件名以及文件大小,以byte为单位

6)根据Uri获得Bitmap
核心代码如下:
private Bitmap getBitmapFromUri(Uri uri) throws IOException { ParcelFileDescriptor parcelFileDescriptor = getContentResolver().openFileDescriptor(uri, "r"); FileDescriptor fileDescriptor = parcelFileDescriptor.getFileDescriptor(); Bitmap image = BitmapFactory.decodeFileDescriptor(fileDescriptor); parcelFileDescriptor.close(); return image; }
运行结果:
7)根据Uri获取输入流
核心代码如下:
private String readTextFromUri(Uri uri) throws IOException { InputStream inputStream = getContentResolver().openInputStream(uri); BufferedReader reader = new BufferedReader(new InputStreamReader( inputStream)); StringBuilder stringBuilder = new StringBuilder(); String line; while ((line = reader.readLine()) != null) { stringBuilder.append(line); } fileInputStream.close(); parcelFileDescriptor.close(); return stringBuilder.toString(); }
上述的内容只告诉你通过一个Uri你可以知道什么,而Uri的获取则是通过SAF得到的!
8) 创建新文件以及删除文件:
创建文件:
private void createFile(String mimeType, String fileName) { Intent intent = new Intent(Intent.ACTION_CREATE_DOCUMENT); intent.addCategory(Intent.CATEGORY_OPENABLE); intent.setType(mimeType); intent.putExtra(Intent.EXTRA_TITLE, fileName); startActivityForResult(intent, WRITE_REQUEST_CODE); }
可在onActivityResult()中获取被创建文件的uri
删除文件:
前提是Document.COLUMN_FLAGS包含SUPPORTS_DELETE
DocumentsContract.deleteDocument(getContentResolver(), uri);
9)编写一个自定义的Document Provider
如果你希望自己应用的数据也能在documentsui中打开,你就需要写一个自己的document provider。 下面介绍自定义DocumentsProvider的步骤:
- API版本为19或者更高
- 在manifest.xml中注册该Provider
- Provider的name为类名加包名,比如: com.example.android.storageprovider.MyCloudProvider
- Authority为包名+provider的类型名,如: com.example.android.storageprovider.documents
- android:exported属性的值为ture
下面是Provider的例子写法:
<manifest... > ... <uses-sdk android:minSdkVersion="19" android:targetSdkVersion="19" /> .... <provider android:name="com.example.android.storageprovider.MyCloudProvider" android:authorities="com.example.android.storageprovider.documents" android:grantUriPermissions="true" android:exported="true" android:permission="android.permission.MANAGE_DOCUMENTS" android:enabled="@bool/atLeastKitKat"> <intent-filter> <action android:name="android.content.action.DOCUMENTS_PROVIDER" /> </intent-filter> </provider> </application> </manifest>
10 )DocumentsProvider的子类
至少实现如下几个方法:
- queryRoots()
- queryChildDocuments()
- queryDocument()
- openDocument()
还有些其他的方法,但并不是必须的。下面演示一个实现访问文件(file)系统的 DocumentsProvider的大致写法。
Implement queryRoots
@Override public Cursor queryRoots(String[] projection) throws FileNotFoundException { // Create a cursor with either the requested fields, or the default // projection if "projection" is null. final MatrixCursor result = new MatrixCursor(resolveRootProjection(projection)); // If user is not logged in, return an empty root cursor. This removes our // provider from the list entirely. if (!isUserLoggedIn()) { return result; } // It's possible to have multiple roots (e.g. for multiple accounts in the // same app) -- just add multiple cursor rows. // Construct one row for a root called "MyCloud". final MatrixCursor.RowBuilder row = result.newRow(); row.add(Root.COLUMN_ROOT_ID, ROOT); row.add(Root.COLUMN_SUMMARY, getContext().getString(R.string.root_summary)); // FLAG_SUPPORTS_CREATE means at least one directory under the root supports // creating documents. FLAG_SUPPORTS_RECENTS means your application's most // recently used documents will show up in the "Recents" category. // FLAG_SUPPORTS_SEARCH allows users to search all documents the application // shares. row.add(Root.COLUMN_FLAGS, Root.FLAG_SUPPORTS_CREATE | Root.FLAG_SUPPORTS_RECENTS | Root.FLAG_SUPPORTS_SEARCH); // COLUMN_TITLE is the root title (e.g. Gallery, Drive). row.add(Root.COLUMN_TITLE, getContext().getString(R.string.title)); // This document id cannot change once it's shared. row.add(Root.COLUMN_DOCUMENT_ID, getDocIdForFile(mBaseDir)); // The child MIME types are used to filter the roots and only present to the // user roots that contain the desired type somewhere in their file hierarchy. row.add(Root.COLUMN_MIME_TYPES, getChildMimeTypes(mBaseDir)); row.add(Root.COLUMN_AVAILABLE_BYTES, mBaseDir.getFreeSpace()); row.add(Root.COLUMN_ICON, R.drawable.ic_launcher); return result; }
Implement queryChildDocuments
public Cursor queryChildDocuments(String parentDocumentId, String[] projection, String sortOrder) throws FileNotFoundException { final MatrixCursor result = new MatrixCursor(resolveDocumentProjection(projection)); final File parent = getFileForDocId(parentDocumentId); for (File file : parent.listFiles()) { // Adds the file's display name, MIME type, size, and so on. includeFile(result, null, file); } return result; }
Implement queryDocument
@Override public Cursor queryDocument(String documentId, String[] projection) throws FileNotFoundException { // Create a cursor with the requested projection, or the default projection. final MatrixCursor result = new MatrixCursor(resolveDocumentProjection(projection)); includeFile(result, documentId, null); return result; }
好吧,文档中的内容大概就是这些了: 一开始是想自己翻译的,后来在泡在网上的日子上找到了这一篇文档的中文翻译,就偷下懒了~
中文翻译链接:android存储访问框架Storage Access Framework
3.Android 4.4 获取资源路径问题:
其实这个SAF我们用得较多的地方无非是获取图片的Uri而已,而从上面的例子我们也发现了: 我们这样获取的链接是这样的:
content://com.android.providers.media.documents/document/image%3A69983
这样的链接,我们直接通过上面的方法获得uri即可!
当然,这个是4.4 或者以上版本的~!
如果是以前的版本:uri可能是这样的:
content://media/external/images/media/image%3A69983
这里贴下在别的地方看到的一个全面的方案,原文链接:Android4.4中获取资源路径问题
public  static  String getPath(final  Context context,  final  Uri uri)  {  final  boolean isKitKat =  Build.VERSION.SDK_INT >=  Build.VERSION_CODES.KITKAT;  // DocumentProvider  if  (isKitKat &&  DocumentsContract.isDocumentUri(context, uri))  {  // ExternalStorageProvider  if  (isExternalStorageDocument(uri))  {  final  String docId =  DocumentsContract.getDocumentId(uri);  final  String[] split = docId.split(":");  final  String type = split[0];  if  ("primary".equalsIgnoreCase(type))  {  return  Environment.getExternalStorageDirectory()  +  "/"  + split[1];  }  // TODO handle non-primary volumes  }  // DownloadsProvider  else  if  (isDownloadsDocument(uri))  {  final  String id =  DocumentsContract.getDocumentId(uri);  final  Uri contentUri =  ContentUris.withAppendedId(  Uri.parse("content://downloads/public_downloads"),  Long.valueOf(id));  return getDataColumn(context, contentUri,  null,  null);  }  // MediaProvider  else  if  (isMediaDocument(uri))  {  final  String docId =  DocumentsContract.getDocumentId(uri);  final  String[] split = docId.split(":");  final  String type = split[0];  Uri contentUri =  null;  if  ("image".equals(type))  { contentUri =  MediaStore.Images.Media.EXTERNAL_CONTENT_URI;  }  else  if  ("video".equals(type))  { contentUri =  MediaStore.Video.Media.EXTERNAL_CONTENT_URI;  }  else  if  ("audio".equals(type))  { contentUri =  MediaStore.Audio.Media.EXTERNAL_CONTENT_URI;  }  final  String selection =  "_id=?";  final  String[] selectionArgs =  new  String[]  { split[1]  };  return getDataColumn(context, contentUri, selection, selectionArgs);  }  }  // MediaStore (and general)  else  if  ("content".equalsIgnoreCase(uri.getScheme()))  {  return getDataColumn(context, uri,  null,  null);  }  // File  else  if  ("file".equalsIgnoreCase(uri.getScheme()))  {  return uri.getPath();  }  return  null;  }  /**
 * Get the value of the data column for this Uri. This is useful for
 * MediaStore Uris, and other file-based ContentProviders.
 *
 * @param context The context.
 * @param uri The Uri to query.
 * @param selection (Optional) Filter used in the query.
 * @param selectionArgs (Optional) Selection arguments used in the query.
 * @return The value of the _data column, which is typically a file path.
 */  public  static  String getDataColumn(Context context,  Uri uri,  String selection,  String[] selectionArgs)  {  Cursor cursor =  null;  final  String column =  "_data";  final  String[] projection =  { column };  try  { cursor = context.getContentResolver().query(uri, projection, selection, selectionArgs,  null);  if  (cursor !=  null  && cursor.moveToFirst())  {  final  int column_index = cursor.getColumnIndexOrThrow(column);  return cursor.getString(column_index);  }  }  finally  {  if  (cursor !=  null) cursor.close();  }  return  null;  }  /**
 * @param uri The Uri to check.
 * @return Whether the Uri authority is ExternalStorageProvider.
 */  public  static  boolean isExternalStorageDocument(Uri uri)  {  return  "com.android.externalstorage.documents".equals(uri.getAuthority());  }  /**
 * @param uri The Uri to check.
 * @return Whether the Uri authority is DownloadsProvider.
 */  public  static  boolean isDownloadsDocument(Uri uri)  {  return  "com.android.providers.downloads.documents".equals(uri.getAuthority());  }  /**
 * @param uri The Uri to check.
 * @return Whether the Uri authority is MediaProvider.
 */  public  static  boolean isMediaDocument(Uri uri)  {  return  "com.android.providers.media.documents".equals(uri.getAuthority());  }
本节小结:
好的,关于本节android存储访问框架SAF就到这里吧,没什么例子,后面用到再深入研究吧, 知道下就好,4.4后获取文件路径就简单多了~